

Click Here to Download the Tutorial 7 Revit Template to use with this tutorial👈⏩💾.
Tutorial 7 - Create a Title Block
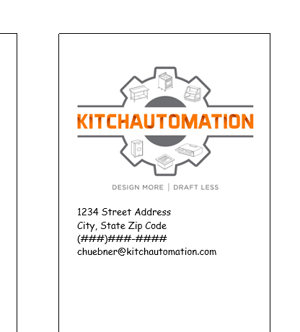
We have made some incredible progress in only six tutorials and now we will start to bring everything together with our own personalized title block. Title blocks come in many shapes and sizes and act like a giant business card for architectural design services. They are almost always branded, there is no industry standard dictating where each element must be placed, and they are one of the few opportunities where you are sharing your company with the world.
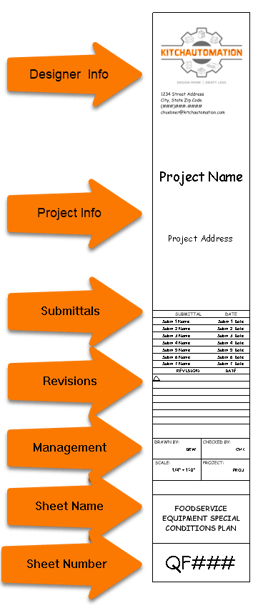
In this tutorial we will go over the steps to make your own custom Revit title block as well as learn a lot of Revit concepts. I will try to keep it simple while also covering all the main components so you have all the skills you need to build your perfect title block. We will include each of the following sections in our title block.
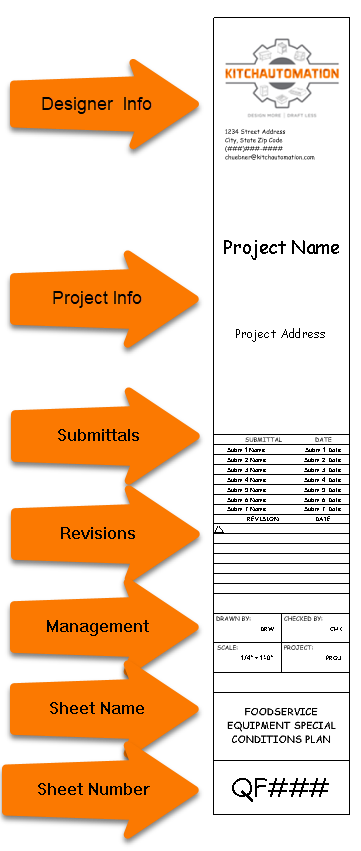
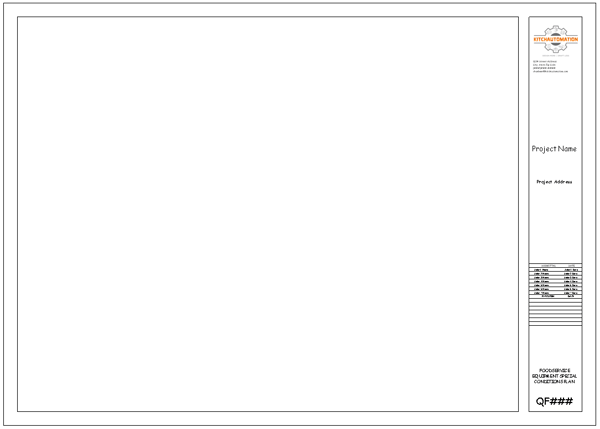
Designer Info - Includes company logo, company name, company address and company contact info.
Project Info - Includes project name and project address.
Submittals - A spreadsheet like area typically with grid lines that displays the name and date of each submission.
Sheet Issues/Revision Schedule - Revit has a built-in feature called Revisions that allows you to enter the information about a revision, mark a revision as issued, and control the visibility of Revision Clouds and tags.
Management Info - Includes Drawn By, Checked By, Designed By and/or Approved By parameters which are all standard Revit parameters that are included in every Sheet.
Sheet Name
Sheet Number
In this tutorial we are going to create a 30” x 42” title block. That is my favorite size and, in my experience, it is the best all-around size for small to medium projects. As so, it was our most used size by a wide margin so if we are going to make a title block then let’s make your most used title block.
To get started we will use a Revit OOTB Title Block template, let’s go grab that now.
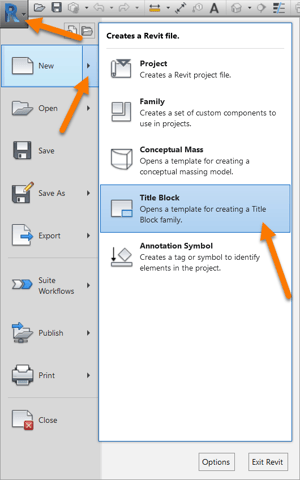
First go to the Revit main menu, then hover over New, then click Title Block.
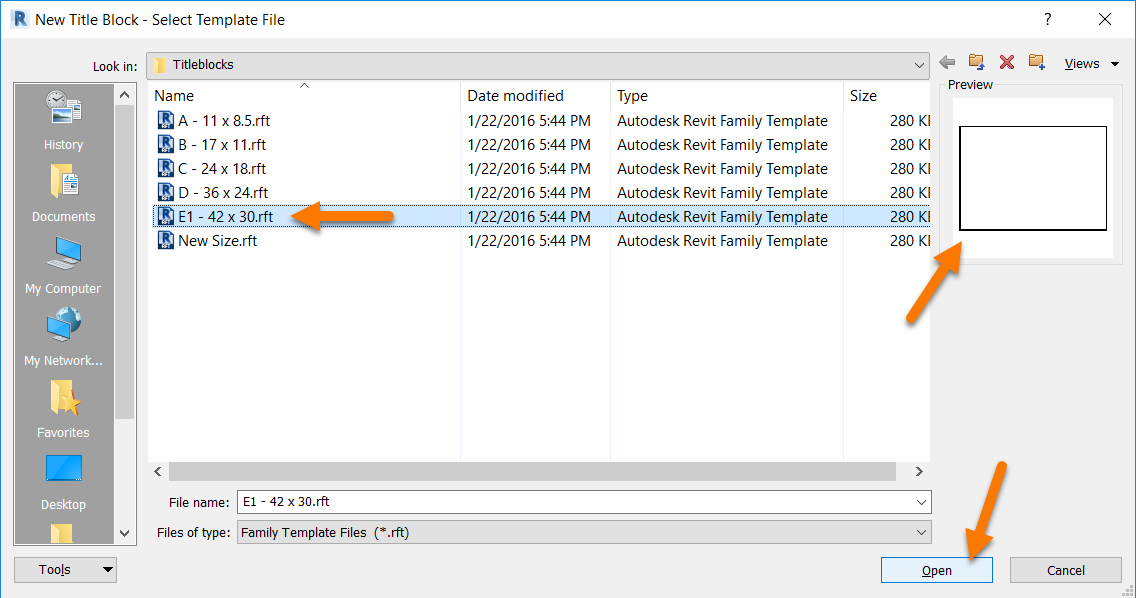
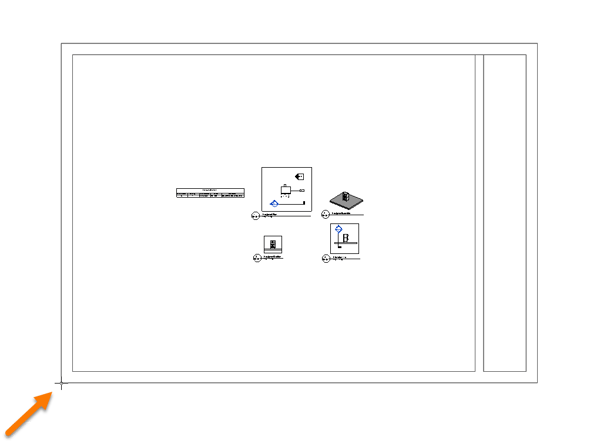
The New Title Block- Select Template File window will appear with a few choices. We will choose E1 – 42 x 30 and from the preview in the upper right they aren’t giving us much to start with.
Select E1 – 42 x 30 and click Open.
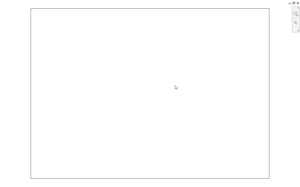
Just as we expected, it is very blank indeed.
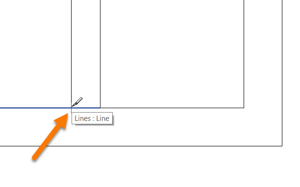
 Alright well we might as well get to know what little lines we got.
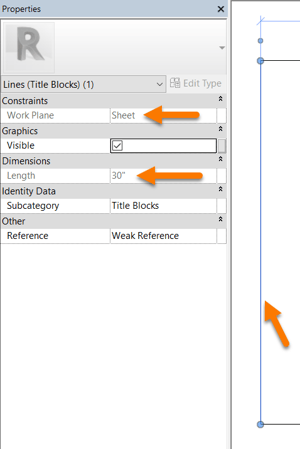
Click on the any of the outer lines.
Title block families aren’t like other families, they are constrained to work on Sheets only.
There is also no scale, so when you draw a 30” line, it will print out at 30”.
This makes it easier for us to create and draw title blocks of any size since we can quickly see the size of every line we draw, it also makes it easy for us to modify a title block to create a different size since we keep many of the same elements and just squeeze them together or pull them apart.
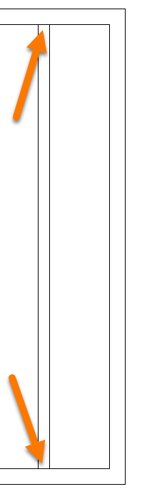
It also makes it very easy to draw our 1” wide margins, let’s do that now.
To create our margins let’s use the Offset tool to offset the entire title block boundary 1” to the inside.
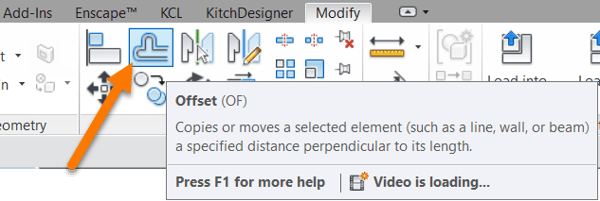
The Offset tool works a little differently than the Move, Copy, and Rotate tools by the way you select the elements to be offset, it is not possible to pre-select the elements and then press the Offset tool to offset them, when you click on the Offset tool you will lose your selection and be forced to select it again.
Just set the offset distance in the Options Bar and then hover over the line you want to offset.
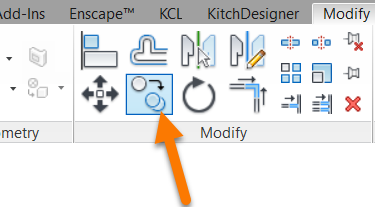
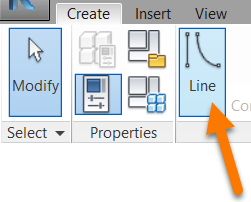
 On the Modify ribbon, click on the Offset tool.
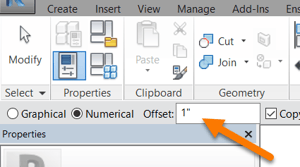
Set the Offset distance to 1”.
Now hover over the title block lines, Revit will show you what the result will be when you click to offset.
Try hovering your mouse back and forth over the line to see how Revit changes the side of the offset.
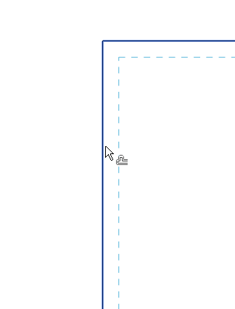
 Press TAB over a line to show the entire boundary in the form of a Chain of Lines then click to create all the new lines at once.
And just like that we have our margins.

Now create a 3-3/4” wide title block bar on the right side, I am going to use Offset again but this time I will set it to 3-3/4” instead of 1”.

Now let’s add one more line 3/4" to the left of our title block bar. This will be the right side of our sheet boundary.
 Now let’s remove those tiny little segments of line in between our title block bar and our sheet boundary.
This is a great way to learn how to use the Split Element tool.
The Split Element tool can also be used to split other types of elements such as walls.
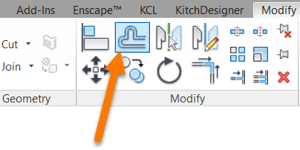
On the Modify ribbon, click on the Split Element tool.
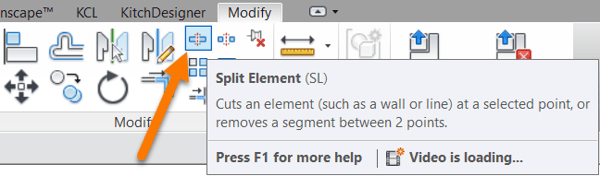
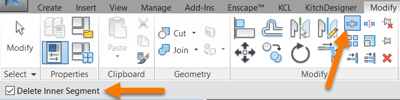
It only has one option on the Option Bar called Delete Inner Segment, we actually want to use this option so turn it on.
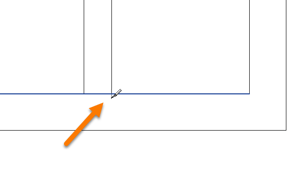
It is very simple to the Offset command, just hover over the intersection where you want to make your first split and then click to split.
Now make your select split and the segment will be deleted.

Looks great, now do the same on the other side.
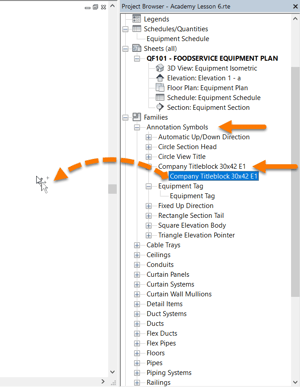
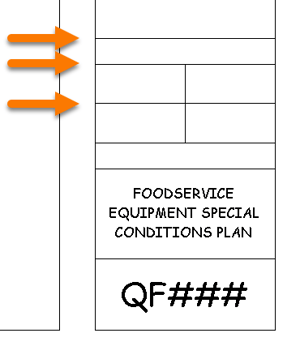
 Our title block is starting to take shape. The boundary is now easily distinguished from the title block bar and the sheet boundary. Let’s give our title block a name, I will name my title block “Company Titleblock 30x42 E1”.
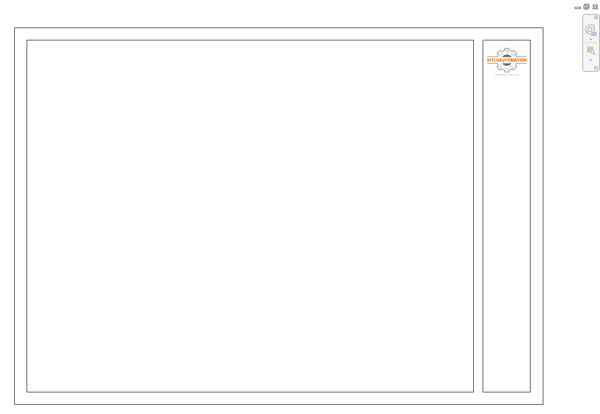
Let’s insert our title block into our Project to see how it will look.
Click Load into Project.
If you had the QF101 Sheet active in the Project before pressing Load into Project, then you will be greeted to a screen where you are able to zoom in and out to place your title block in the drawing area.
The insertion point happens to be the bottom left hand corner.
If you did not have the QF101 Sheet open and active in your Project then you will need to place your title block onto the QF101 Sheet.
The title block will be loaded into the Project so a simple drag and down from the Project Browser will do the trick.
Then you will be greeted with the same screen as above where you are able to place the title block on the sheet.
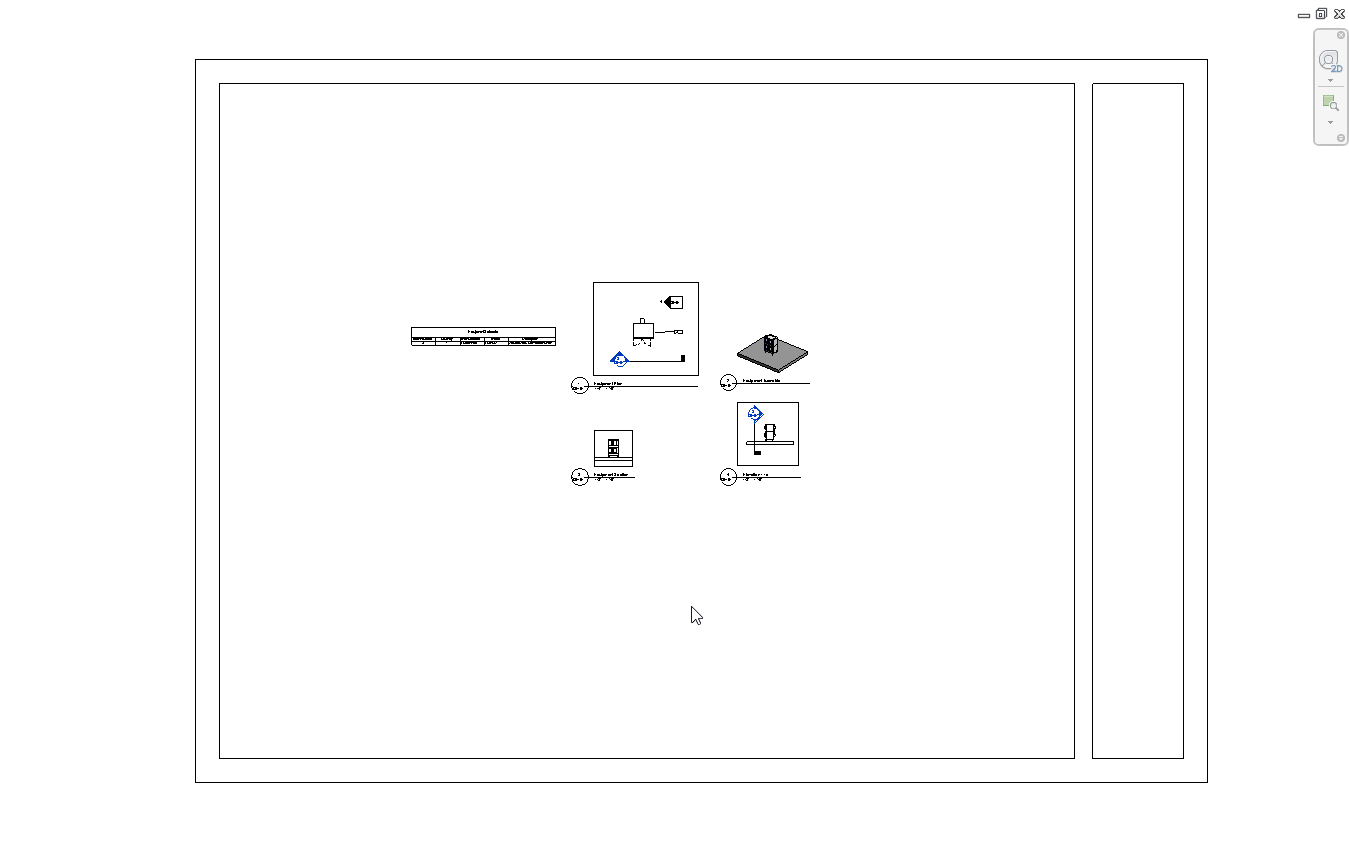
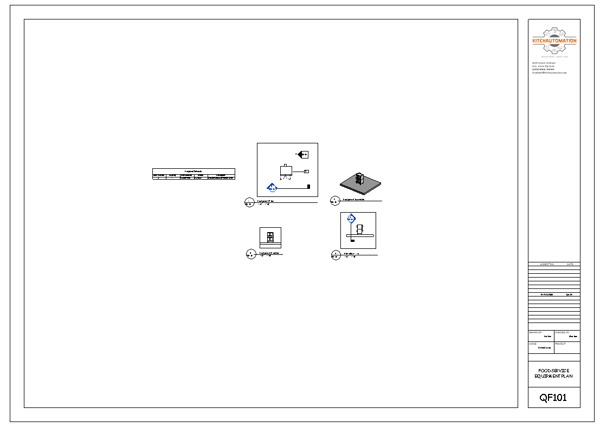
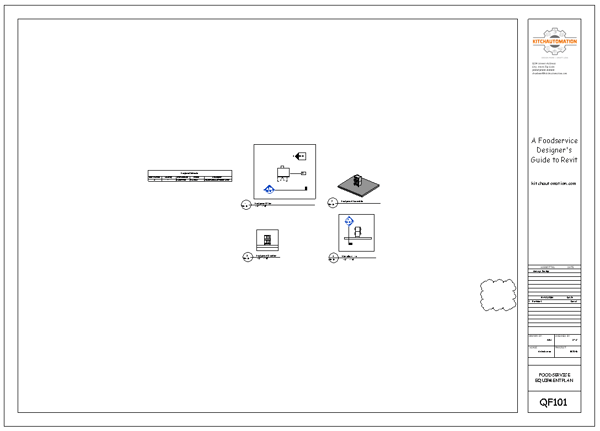
Looking good, seems a little empty but once you add more than 1 piece of equipment it fills up quick.
In Revit, title blocks are just another type of Annotation family.
Adding title blocks and editing title blocks works the same way as adding or editing any other type of family.
You can use one family for every sheet and when you edit that family and reload it, all sheets will be updated.
We are going to create a title block family that can be used for every sheet in our set and every submittal in our projects.
We will still be size specific though, so we will create a ARCH E1 size 30” x 42” title block and a ARCH D 24” x 36” title block.
You could load a title block family into the project and switch out the other title block for the new one. All the information will repopulate into our new title block sizes and its glorious.
While it is possible to have multiple title block sizes in the same family, I don’t recommend it for the same reason I don’t recommend using linked AutoCAD files in a title block family. Title blocks are used on every sheet in a project, so there could be 10-50 instances of a title block family in your Revit model.
If each instance has 3 different families inside of it, then you know have 30-150 instances of your title block. That will slow down your Revit model.
Using linked AutoCAD files is even worse. Adding 10-50 instances of an AutoCAD link will absolutely slow down your model and it could even cause crashes. It will then cause issues for the rest of the design team that is loading in your Revit model.
It is very easy to redraw the lines and then delete out the linked CAD file or even search for CAD to Revit convertors to convert your CAD lines to Revit lines, never use linked CAD files in your Revit title blocks.
Alright let’s get back to creating our title block.
Double-click your title block family to open it back up.
We will start with the Designer Info.
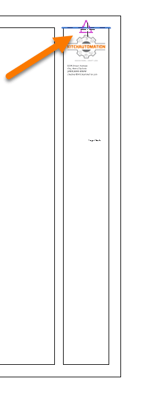
Let’s kick this off my adding our company logo.
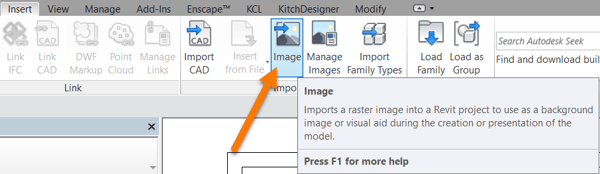
 On the Insert ribbon, click on the Image tool.
Select a logo image file to place on your title block. 400 x 400 is a good size to stay below and try to use a PNG instead of a JPG of TIFF, if you must use a JPG then try to stay below 100kb.
After you click Open, Revit will show you the size of your image when you are placing it, but it can also be easily resized after you place it.
Only one step in and our title block is already starting to pop.
Next let’s add our address and our contact info using Text below our company logo. We will use the standard Text tool for this, not the Label tool since this information does not change.

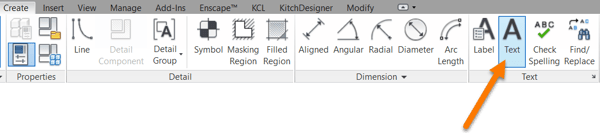
 On the Create ribbon, click on the Text tool.
The Text tool works a couple different ways, you can simply click anywhere and start writing text, or you can click and drag a rectangle to create what Revit calls ‘wrapping text’, I just call it a text block.
We will use this method now since we want to confine our text to a defined area, in this instance it is our title block area.
Click in the upper left corner and drag to the bottom right corner to create a text block.
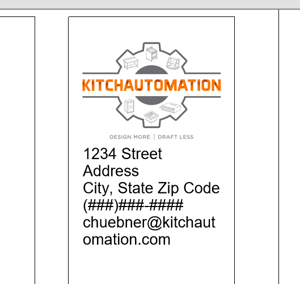 Now let’s add our address, not the project address but our own address.
It should probably be a smaller font size since we don’t want it to stand out.
Hmm, this text seems much larger than what I was thinking, but where are the Font settings?
I bet if I gave you one guess you would probably point me to the Properties Palette and you would be correct.
Text in Revit is a little bit like everything else in Revit, it has Type Properties, the settings are in the form of parameters, and changing the type is drop-down menu simple.
While it may seem like bad design to place the Text settings inside the Type Properties, and I might agree, it does have some great benefits. For example, since all text must have a Type, the number of variations tend to be low and the standards are easy to maintain. Changes to the Text Type will update all Text in the project of that Type.
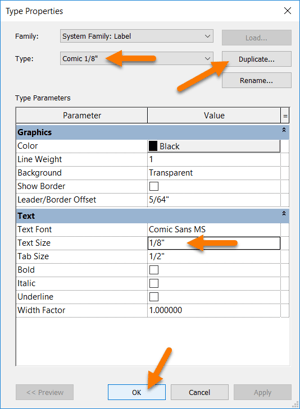
The downside is that we must create a new Text Type for each text size, font, and style. This will seem like a lot of work and a lot of Text Types but I found it to be the opposite. To prove it, I will create this title block with only one text type, a crisp 1/8” size in playful Comic Sans MS font.
You may be thinking, but what about the Project Name, that is definitely larger than the rest of the title block text, and you are correct but the Project Name is not Text, it is a Label.
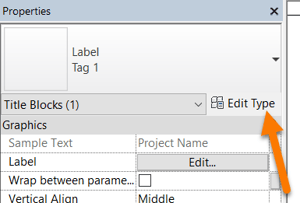
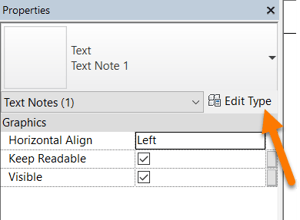 To begin, let’s first open our Text Type Properties using the Properties Palette.
Most of the parameters in the Text Type Properties are common and self-explanatory.
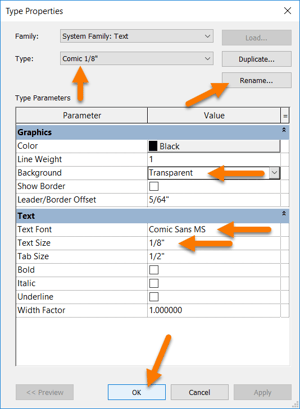 Background acts like a Masking Region, if you choose Transparent then the Text does not cover anything up, if you choose Opaque then it will hide whatever it covers. We will change this to Transparent so we don’t accidently cover up our own Text.
The only other parameter I will mention is the Show Border parameter, this turns our Text into a note or callout if you add leaders.
Great, so change your font to whatever you like, mine is Comic Sans MS.
Change your Text Size to 1/8”.
Also let’s rename our Text Type, I will call mine Comic 1/8” after the font and size.
Click OK to return.
That looks much better, our Text now fits nicely into our title block area.
You may be thinking you want to create more Text Types for future use but creating extra text types in the title block family will be a wasted effort. Any Text Types you create in a family do not transfer to the Project after insertion, they are confined to the Family file.
Next up is the Project Name and the Project Address.
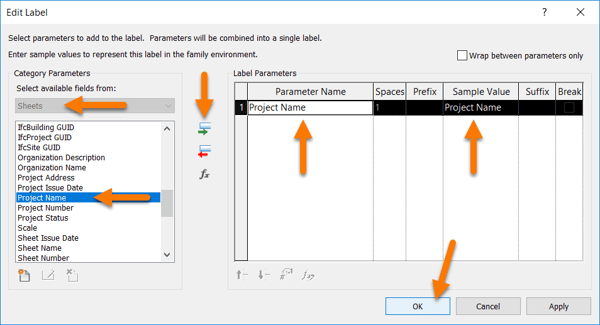
The Project Name and Project Address are both going to be Labels. Labels allow us to pull data from a Revit parameter, in this case a Revit Project Parameter.
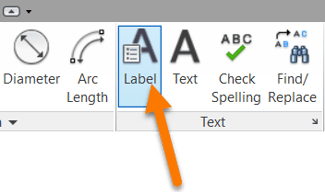
 On the Create ribbon, click the Label tool.
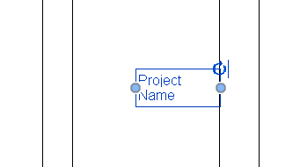
Click anywhere to begin the Label setup, we will move it into the correct place after its setup.
You know the Label drill but here’s a refresher:
First pay attention to the Category so you understand where to look in the V/G Overrides, Title Block families use the Sheet Category.
Next select the Project Name parameter, click the green arrow to move it to the Label, then rename the Sample Value if you want, this time I will keep the default value of Project Name and Project Address.
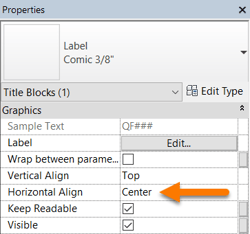
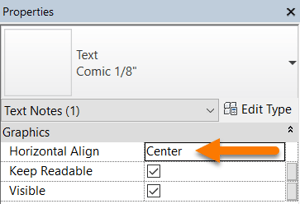
Alright so now we have our Label in our title block but we need to fix the text alignment and center the Label in our title block area, I do love me some symmetry.
Go to the Properties Palette and change the Horizontal Align to Center.
This is a start but now we need a way to center the text in the middle of the title block area, like a centerline to use as a reference. A perfect job for a Reference Line.
 On the Create ribbon, click the Reference Line tool.
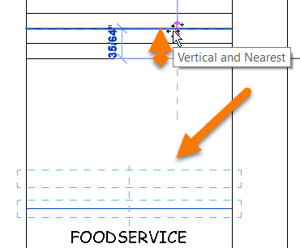
In the Drawing Area, click to start the line on the Midpoint Snap (magenta triangle) at the top of our title block area.
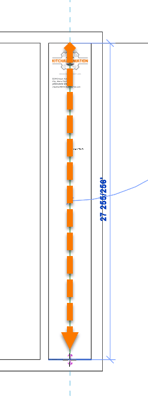
Then click on the exact opposite midpoint, you may be wondering why there isn’t another Midpoint Snap, but that is because Revit is giving you the Perpendicular Snap instead, the magenta double arrow is the Perpendicular Snap symbol.
Now we have this green line going down the center of our title block area.
I kind of like the green color for reference lines but if you don’t you can always go to Object Styles on the Manage ribbon and change it.

I like to shorten the Reference Line a bit so it is only in the area we need it, we can always stretch it back if we need to.
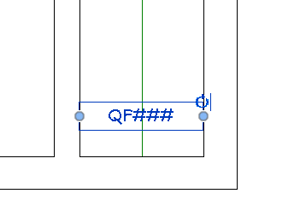
To center our Project Name Label I find the best way is to just stretch out the grips of the Label until they touch both sides of the area you care centering the Label between.
Unfortunately even with the Reference Line there is no way to Snap a Label to anything in Revit.
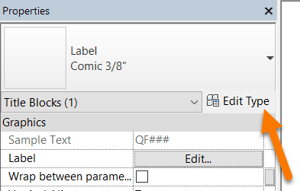
 Once you have the Project Name Label centered, keep it selected and open the Label Type Properties.
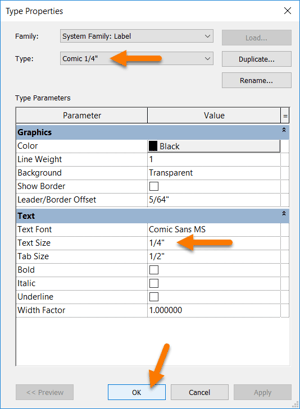
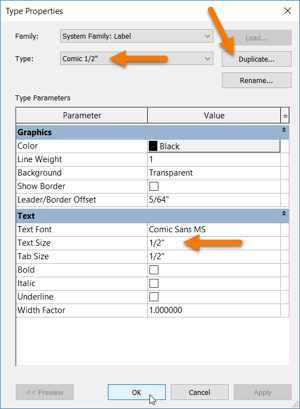
We need to change the font size which seems a little small for the Project Name.
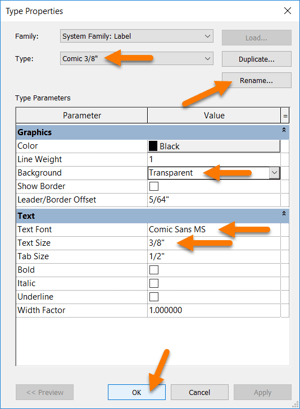
This should look very familiar, it is almost identical to the Text Type Properties we just created.
This time I recommend using a Text Size of 3/8”.
Also before we leave switch the Background to Transparent so we don’t accidently cover up our Project Address text with an opaque white background.
As always let’s rename it, I will rename mine to Comic 3/8”.
Click OK.
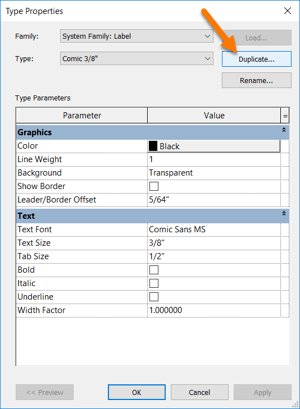 Now let’s repeat the process to create our Project Address.
This time we need to change our font to a small size to fit the address.
Let’s open the Label Type Properties and Duplicate it to create a 1/4” Text Size version.
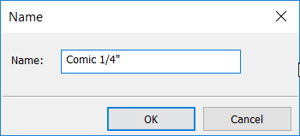
Revit asks for the new Name when you click Duplicate.
Then change the Text Size to 1/4" and click OK.
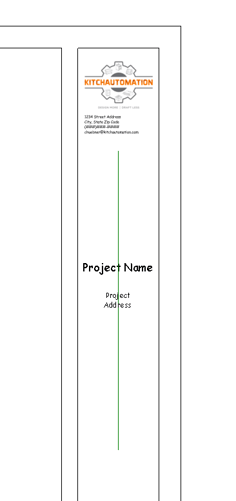
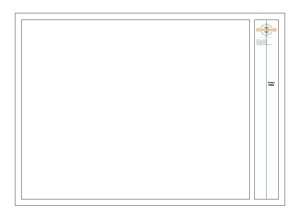
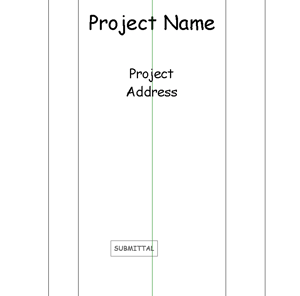
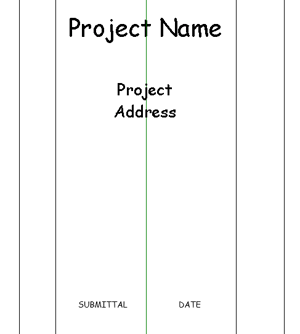
Back to our Project and our Title Block is taking shape and like a proud parent we can step back and admire it.
Next up, the Sheet Info.
The Sheet Info is the same process as the Project Info with some different font sizes and a couple new Label Types. We will use 1/2" for our Sheet Number and 7/32” for our Sheet Name. You could use 3/16” for your Sheet Name but it’s a tad too small and you could try 1/4" but it’s a tad too large, 7/32” happens to be just right.
 Let’s start with the Sheet Number
On the Create ribbon click Label.
Then click to place your Sheet Number Label.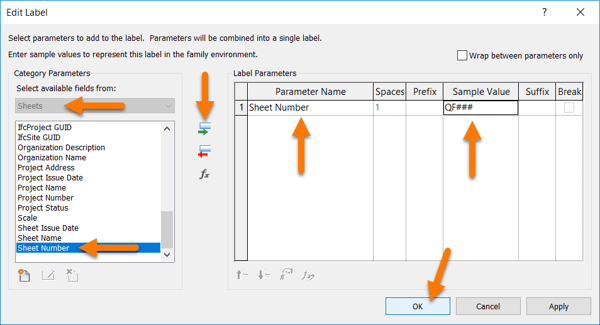
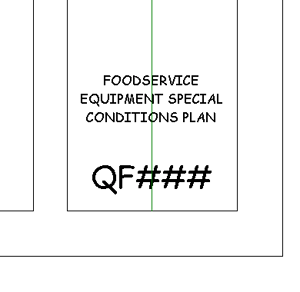
Change the Sample Value to QF### and click OK to return.
In the Properties Palette, change the Horizontal Align to Center.
Also stretch the Reference Line to the bottom.
Now stretch the grips of the Label to the edges of the title block area to center the Sheet Number.
Now all we need to do is increase the Text Size in the Label Type Properties.
Make sure the Label is selected and click Edit Type in the Properties Palette.
Click Duplicate, then Rename to Comic 1/2" and change the Text Size to 1/2".
Before we return to the title block i want to explain something about Revit.
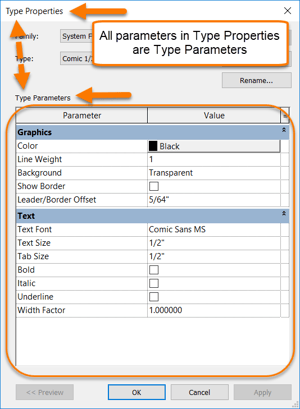 By now these Type Properties windows are all starting to blend together, and that is great because you are learning one of the fundamental concepts of Revit, Type Parameters. All of the parameters inside Type Properties windows are Type Parameters, they affect everything using this Type.
There is another side to the parameter coin, another type of parameter called an Instance Parameter.
Instance Parameters are the opposite of Type Parameters, Instance Parameters only affect a single Instance of a family whereas a Type Parameter affects all families of a specific Type.
Every parameter in Revit falls under one of these two categories, Type or Instance. You have already encountered both of these types of parameters; every time we open a Type Properties window we are working on Type Parameters and every time we go to the Properties Palette we are working on Instance Parameters.
Type Properties is where you control the Type Parameters of a family type or element and the Properties Palette is where you control the Instance Parameters of a family instance. Keep that fresh in your mind and we will build on it in just a little bit.
 Ok now you can click OK and return to the title block.
Looking great.
Next up is the Sheet Name Label.
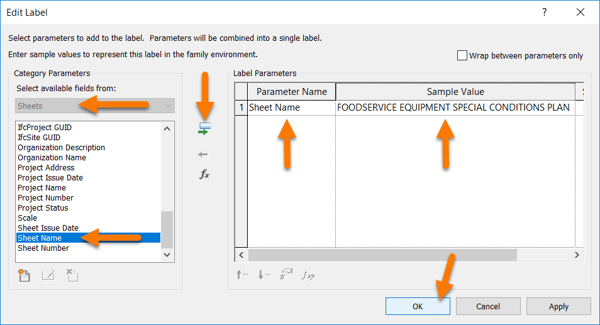
Here we will again use a custom Sample Value, this time I try and use a very long sample value that would accommodate the longest name that I would encounter, like when you have multiple kitchens on different floors.
Once you have added the Sheet Name and adjusted the Sample Value, click OK.
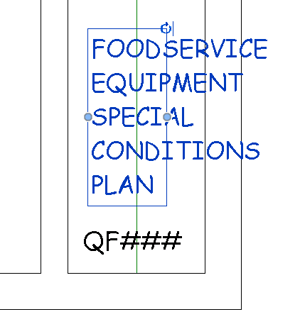 Oops we still need to change the Text Size to 7/32”, not 1/2” like our Sheet Number.
Go back to the Type Properties and use the Duplicate button to create a 7/32” Type.
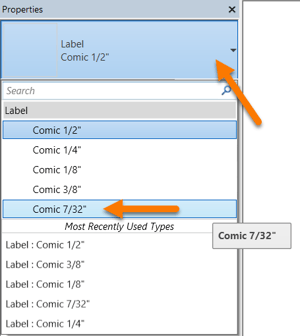
Once you have the Type created, you can use the drop-down menu in the Properties Palette to change the Type on the fly.
This is a great tool, switching families on the fly can be very powerful.
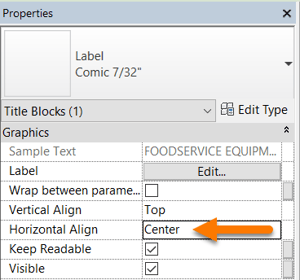
Also make sure you change the Horizontal Align to Center.
This is an Instance parameter, it only changes the Horizontal Align of this one Label, one instance.
Center the Label in the title block above the Sheet Name and this section is complete.
Nice job!
Next up, the Submittal section.

Our progress is impressive but not over yet.
We still have two major areas to create, the Submittal section and the Revision Schedule.
The Submittal section is where the details and dates of each of your major submissions is placed, whether its Concept Design or Permit Drawings or everybody’s favorite the 100% Construction Documents.
this section serves as the official record on when the plans were sent out, and quite frequently it is the first place a designer looks when finding a set of their plans on the jobsite to check to see if they are indeed the latest submission.
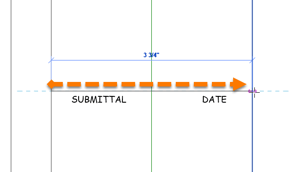
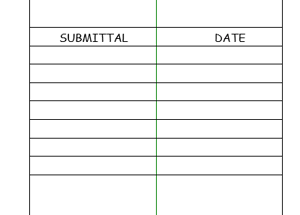
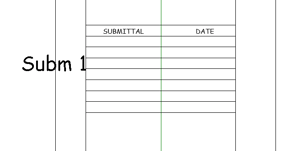
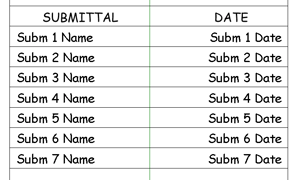
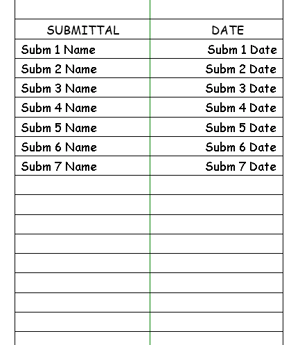
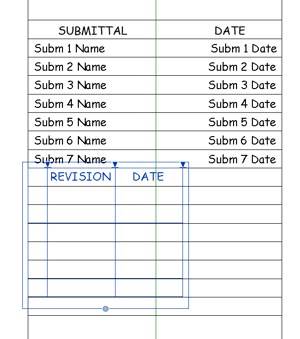
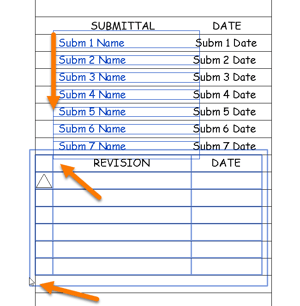
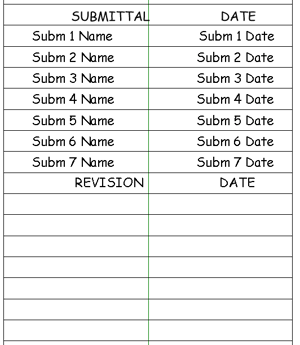
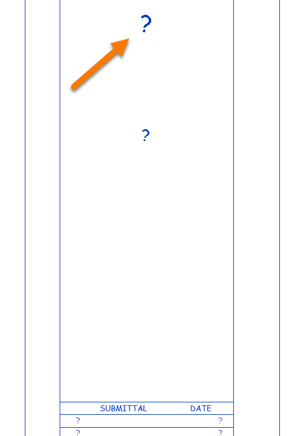
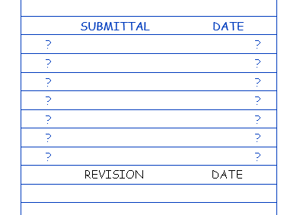
The Submittal section is a simple 2-column list, Submittal Names on the left paired with Submittal Dates on the right, each column with a title on top.
We will create the Submittal section using Text for the headers, Lines for the column gridlines, and Labels for the Submittal Names and Submittal Dates. When you create a submittal you will fill in a single row, one Submittal Name and one Submittal Date.
So let’s get started, we will begin by creating the column titles using Text.
On the Create ribbon, click on the Text tool.
Then click just below the Project Address to create the Text, then in all uppercase type SUBMITTAL.
Don’t be worried about the exact placement, it is easy to move these things around once they are created and to be honest I really don’t even know the exact placement yet until we get farther along so just do your best and we will tweak it as we add.
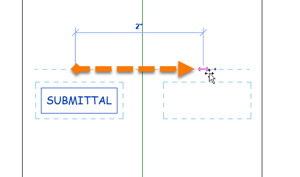
Use the Copy tool to copy the Text we just created, then click to place a copy just to the right of our submittal Text.
This will be our Submittal Date, but type it in all uppercase as well, so "DATE".
Also change the Horizontal Align parameter of both Text Notes to Center.
Once you have something similar to this we are ready to start adding the Lines.
We are going to draw a simple grid with the Line tool.
On the Create ribbon, click the Line tool.
Draw one horizontal line just about the Text Notes.
To create our grid, we are going to use the Offset tool, the space in between our horizontal lines will be 35/128”.
Surely you are wondering why and the reason is simple, 35/128” is the default spacing of the Revision Schedule.
Ideally, we would like our Submittal section and our Revision Schedule to look similar so they can be placed together without looking like two different schedules. This is just one approach though that has the benefit of letting me teach both methods, but there are many designers that only use a Submittal section for all of their submittals and revisions. There are also designers that use only the Revision Schedule for all of their submissions and revisions. I was a hybrid, I used the Submittal section for the planned submittals and then used the Revision Schedule for the surprise revisions.
On the Modify ribbon, click the Offset tool.
Let’s offset our horizontal line by 35/128” a total of 8 times, 1 for our title row and then 7 more for our possible submissions.
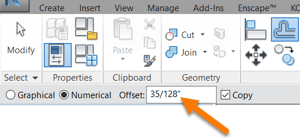
Insert your Offset distance in the Options Bar.
Don’t worry about offsetting the lines perfectly around the Text, just move the Text back to the middle of the top row when you are done offsetting.
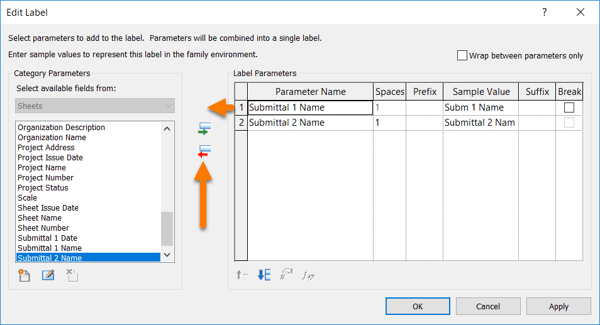
Next let’s create the Labels for the Submittal Names and Submittal Dates. We will create 14 Labels total, 7 Submittal Name Labels and 7 Submittal Date Labels.
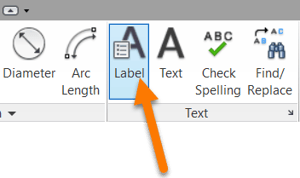 On the Create ribbon, click on the Label tool.
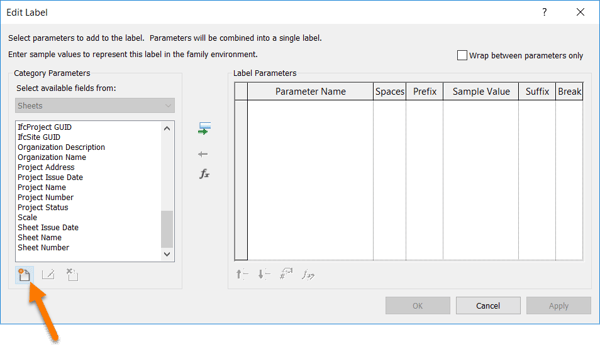
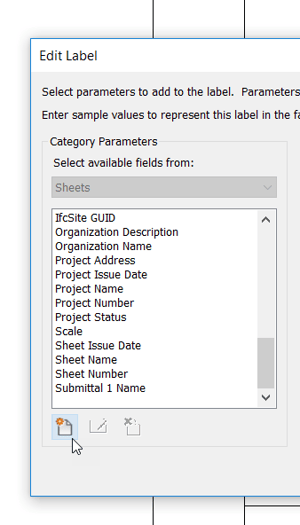
Click anywhere to open the Edit Label window.
Browse through the Sheet Category parameters that we have to choose from and it doesn’t look good, there really isn’t anything in here that we can use for our (7) Submittals and Dates. Hmm…what do we do when Revit doesn’t give us the parameters we need to create our Labels?
The solution happens to be right in front of us, all we need to do is use the Add Parameter button just below the parameter list.
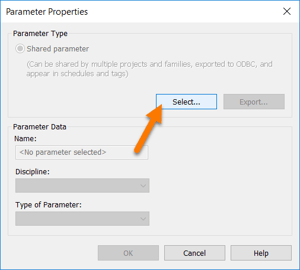
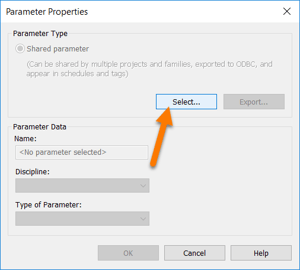 This will bring up the Parameter Properties window.
Revit only gives us one choice of Parameter Type, a Shared Parameter.
Earlier I explained the difference between Type and Instance parameters but this is different.
While every parameter must either be a Type parameter or an Instance parameter, they can also be classified by Parameter Type.
Let's dive deeper.
In Revit, there are (4) different types of parameters. Project, Family, Global, and Shared.
- Project parameters are specific to a single project file. They are created and stored in a project file.
- Family parameters are specific to a family file. They are created and stored in a family file.
- Global parameters are specific to a single project file like Project parameters, but they are not assigned to categories like all other parameters. They are created and stored in a project file.
Shared parameters are portraying by Revit as another type of parameter like a Project, Family, or Global parameter but I am going to explain why that is misleading. A parameter must either be a Project parameter, a Family parameter, or a Global parameter. Shared parameters are not in that group.
What is a Shared parameter?
A “Shared parameter” is not a type of parameter, it is the data to create a parameter. It is a parameter definition in the form of a .txt file that can be shared to other projects, users, or families. It is the blueprint to create another parameter or set of parameters.
Shared parameters can create Project parameters or Family parameters and if you create both from the same Shared parameter then you can share data between a Project parameter and a Family parameter.
Shared Parameters make standardization possible across entire companies or even a whole industry.
We are going to create a shared parameter file now that will contain our Submittal Name and Submittal Date parameters. We will use these parameters to create Family parameters in our Title Block and then we will use them to create Project parameters in our Revit template.
This will allow us to do some really great things like switching title blocks families to a different size and still having all our submittals and submittal dates transferring.
Shared parameter files should be distributed with your project template since each user will need to have the shared parameter file on their hard drive to use the project template, Revit will ask you to browse to the location of the missing shared parameter files when you first open or insert a project or family file with shared parameters.
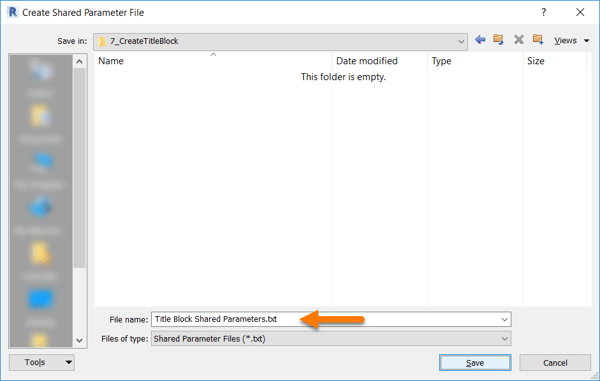
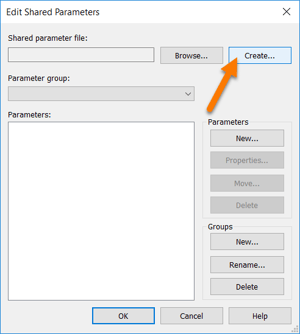 First step is to Create a shared parameters file.
Specify a location on your hard drive, preferably next to your project template file since they should stay together.
Mine is named Title Block Shared Parameters.txt.
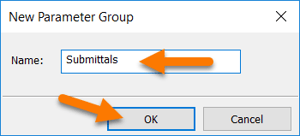 Next step is to create a Group.
All shared parameters must have a group, not to be confused with Revit Categories, this group is just for user organization.
I will name my group “Submittals”. 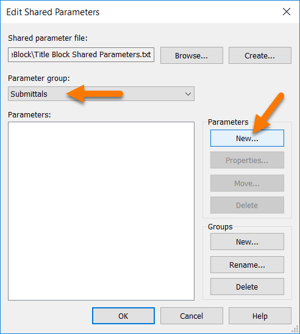
Now that we have our group created we can start creating our shared parameters.
Click on the New button in the Parameters group.
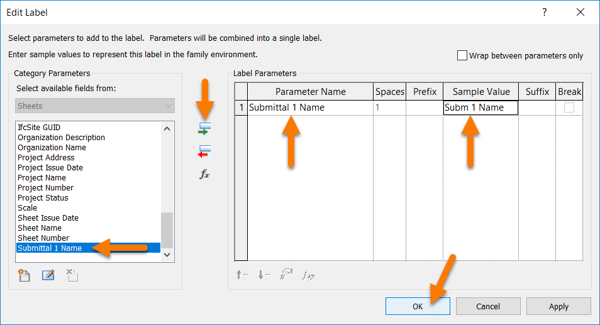
Name the parameter, Submittal 1 Name.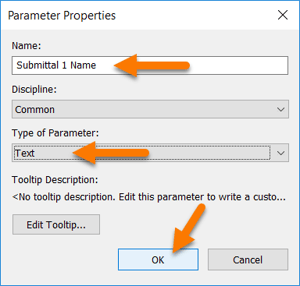
Then change the Type of Parameter to Text.
Once your finished click OK.
You just created your first shared parameter!
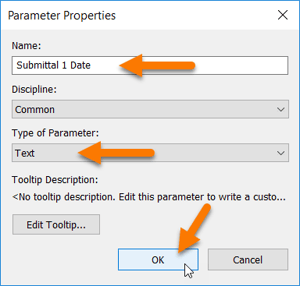
Let’s create a Submittal 1 Date parameter by doing the same steps as above.
When asked for Type of Parameter, we will again select Text.
Click OK when done.
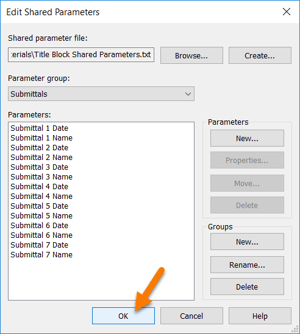 Alright so now that we have finished our Submittal 1 Name and Submittal 1 Date parameters, go create the remaining parameters.
We need all the way up to Submittal 7 Name and Date. Once you are finished your Edit Shared Parameters window should look like this.
Then click OK.

Once you press OK you will return to the Shared Parameter window.
Remember before we created our shared parameters file, we were being prompted to select the parameter we wanted to use for our Label.
Select the Submittal 1 Name parameter and click OK.
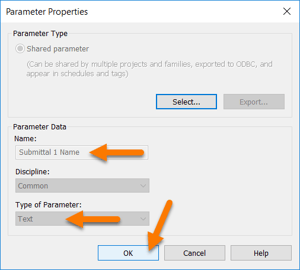
In the Parameter Properties window all we need to do is double-check our Parameter Data is correct and then click OK.
We have successfully created our own shared parameter and can now use it in our Label.
Select the Submittal 1 Name parameter, click the green arrow to move it to the Label, then click the Sample Value to change it to something shorter so it fits in our Submittal area.
 Then click OK.
Almost…we need our Label text font size to be like to our Text Note font size which was 1/8”.
 Let’s create a Label Type that is 1/8” now.
Remember, select the Label and then click Edit Type in the Properties Palette to open the Label Type Properties.
Then use Duplicate to create a new Type with 1/8” Text Size.
Click OK to finish.
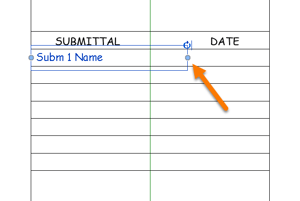 I like to keep my Submittal Name Label as Left Aligned, then I align the left side with the title block and extend the text box 2/3 of the way to the Date to make room for long Submittal Names.
Now let’s create a Label for the date.
On the Create ribbon, click on the Label tool.
Then click anywhere in the title block to open the Edit Label window.
In the Edit Label window we still need to click the Add Parameter button to add our Submittal 1 Date parameter.
Then click Select.
Now select the Submittal 1 Date parameter and click OK.
Remember to double-check the Type of Parameter.
If you do find an error, simply go back and Edit the shared parameters file, delete the incorrect parameter and create a new correct parameter.
If correct click OK.
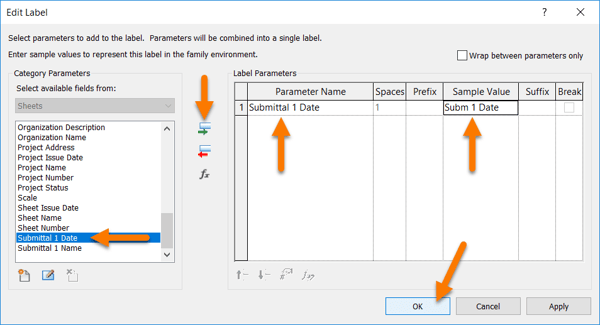
We now have our second new parameter, the Submittal 1 Date parameter. Select it and move it to the right, then change the Sample Value to something shorter like Subm 1 Date and click OK.
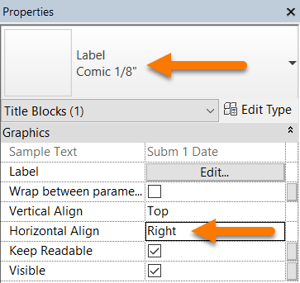
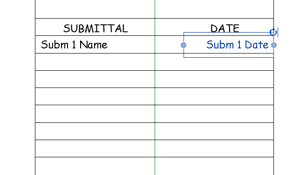 This time I changed the Horizontal Align to Right, then placed the Label with the right grip aligned with the title block.
The left grip is about 1/3 of the way towards the submittal name, which lines up with where the submittal name text box ended.
We are now ready to repeat the same steps to finish out our Submittal area.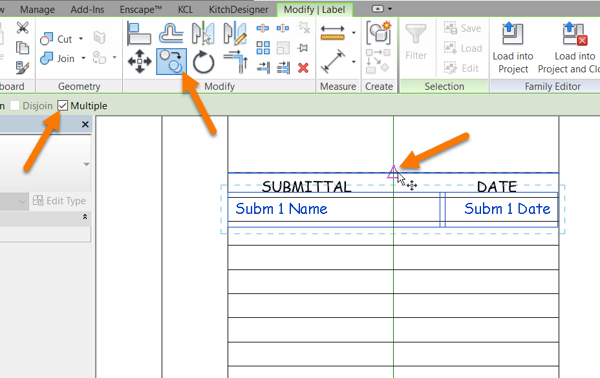
To help speed this process along, we can learn how to use the Multiple option of the Copy tool.
First select both of the Submittal Labels and click the Copy tool.
Next check the Multiple box to allow you to make multiple copies.

Use the submittal grid lines as your reference points, this way we can keep the perfect spacing between our labels all the way down.
 Now we must Edit each Label, select the correct shared parameter and change the Sample Value.
We will also need to use the red arrow to remove the Submittal 1 parameters.
Congratulations on creating a shared parameter file with 14 custom parameters and Labels.
Very impressive!
Onward!

Next up, the Revision Schedule.
I mentioned this before but it’s worth mentioning again, adding a Submittal area and a Revision Schedule to your title block is not required, you could easily just use the Submittal area for your revisions or you could use the Revision Schedule for your submittals. But it is a little tricky using the Submittal area for all your revisions if you want to use Revision Clouds and it is even more difficult to use the Revision Schedule for all your submittals due to how Revisions can be hidden and ‘Issued’ in the Revision Manager.
So while it is not a requirement to have both a Submittal area and a Revision Schedule, you will find it is far easier to manage your submittals and revisions when you use both the Submittal area and the Revision Schedule and use them correctly.
I also like to take it one step further and not only use both but blend them together in a way that makes it look like they are one cohesive unit. They will share the same font, font size, spacing, and indentation. Once we are done, you won’t even be able to tell that they are different.

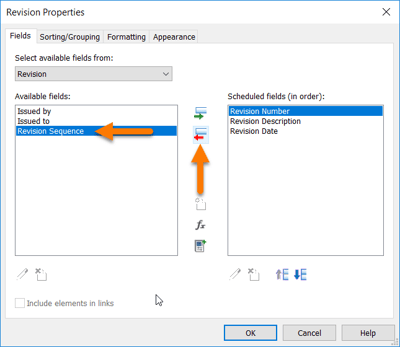
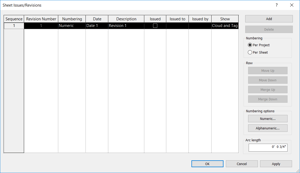
Let’s begin by creating our Revision Schedule, on the View ribbon, click on the Revision Schedule button.
 This will open the Revision Properties, Revision Properties is very similar to the Schedule Properties that we used back in Tutorial 1, the Create Equipment Schedule tutorial, the only difference is the Revision Properties do not have the Filter tab.
On the Fields tab, remove the Revision Sequence field from the Scheduled fields by using the red arrow.
We only need the Revision Number, Revision Description, and Revision Date fields.
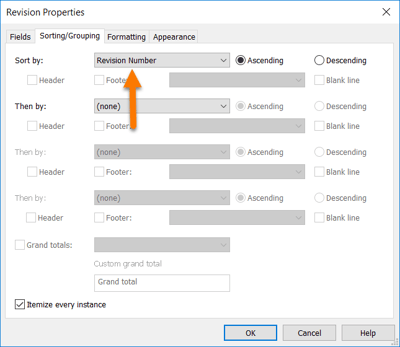
Next select the Sorting/Grouping tab.
In the Sort by drop-down menu, select Revision Number.
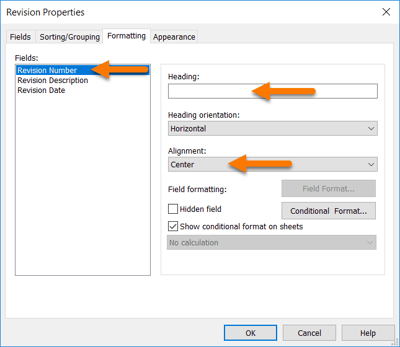 Next select the Formatting tab.
Here we will need to make changes to all three fields, let’s start with the Revision Number field.
Remove the Heading completely, we do not want to show a Heading for the Revision Number.
Also change the Alignment to Center.
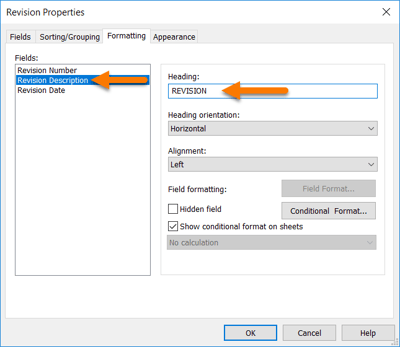 Next select the Revision Description field.
Remember we are trying to match the look of the Submittal area, so here we also want to use uppercase for the Heading.
Change the Heading to “REVISION”.
Left Alignment is the default and what we will use to match the Submittal area.
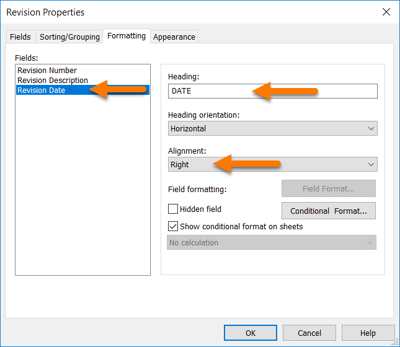 Next select the Revision Date field.
We also want to use uppercase here, change the Heading to “DATE”.
Change the Alignment to Right.
 Next select the Appearance tab.
Uncheck the Grid Lines, we will draw our own lines to match our Submittal area.
Change the Height to User defined, this will allow us to stretch the Revision Schedule to add more Rows and visualize how large it will be once full.
Uncheck the Blank Row before data.
Uncheck the Show Title, the Headers are all that we need.
Finally change the text to Comic 1/8” for both the Header text and the Body text.
Once you finish, click OK.

This sends you to the Revision Schedule, same as if you double-clicked the Revision Schedule in the Project Browser. This is confusing though, the issue is that we don’t want or need to go into the Revision Schedule we just created, there is nothing to do in here anyways. What Revit didn’t do is 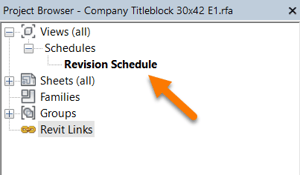 explain that, by clicking OK in the previous screen, we actually created a new Schedule.
Check in your Project Browser, under Views then under Schedules and there it is, your very own Revision Schedule.
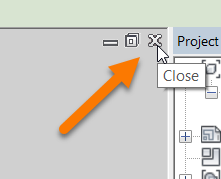
So what we want to do here is close out of the Revision Schedule and return to the Title Block.
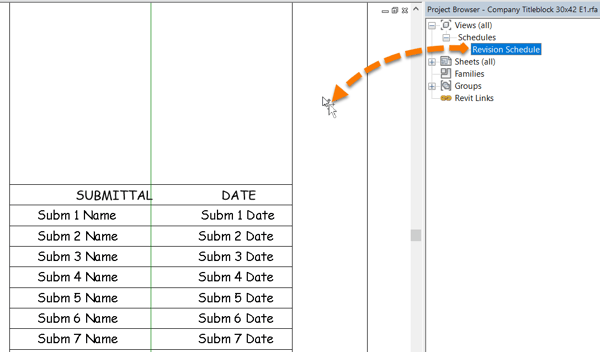
Then drag and drop the Revision Schedule from the Project Browser onto your Title Block Drawing Area.
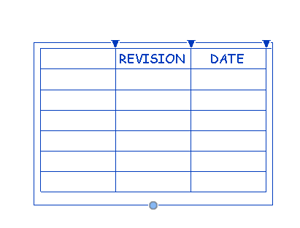 Once you click to place your Revision Schedule, select it and it should look something like this.
Awesome.
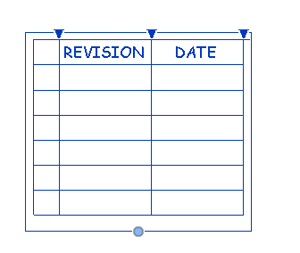 Now change the width of the 1st column to be a small single number square, like this.
Even better.
 Ok so now we want to get ready to Move our Revision Schedule into place but before we do we should copy our grid lines from the Submittal area to just below, it will be much easier to do this now before we set the Schedule on top.
I am going to select and Copy all but the top line, so 8 lines in total.
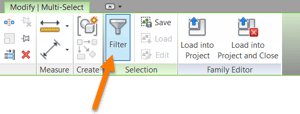 Once you select everything with a rectangular selection, you can filter out your selection by using the Filter tool on the Modify ribbon.
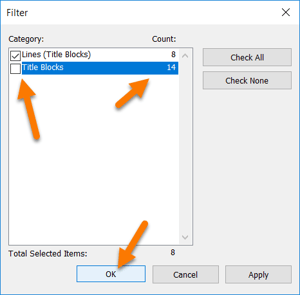 Filter allows you to remove some of the elements that you have selected by unchecking them.
Uncheck the Title Blocks, those are the Labels.
You can easily tell by looking at the Count.
Click OK and now you only have the (8) Lines selected.
 Now click the Copy tool.
 Select the top corner as your start point, then click the bottom corner as your endpoint.
This will copy all 8 lines into the perfect position without overlapping any of the lines. If I copied the top line also, we would end up with 2 identical lines on top of each other.
This image shows the Copy in progress, the dotted lines are the projection of where the copied lines will land.
This shows the grid lines before we add the Revision Schedule.
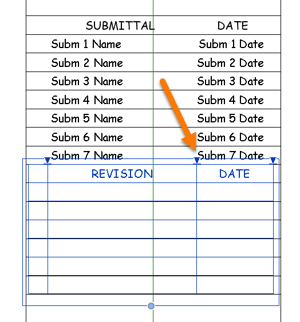
 Now we can move the Revision Schedule into place, for now just match the top left corner to the corner just below the Submittal 7 Name.
Perfect.
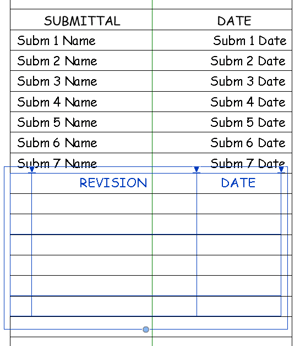
 Now let’s stretch the Revision column to match the beginning of the Submittal Date column.
Like this.
Real quick, let’s admire how those grid lines match up with the natural spacing of the Revision Schedule. Good stuff.
 So now I just want to stretch the Date column just a tad, about half as wide as the Revision Number column. This will give us just enough indent to keep our Dates from blending in with the edge lines.
Once it looks like this, your Revision Schedule is complete.
Now let’s go back and move some of the Submittal Labels and Headers to align with the Revision Schedule.
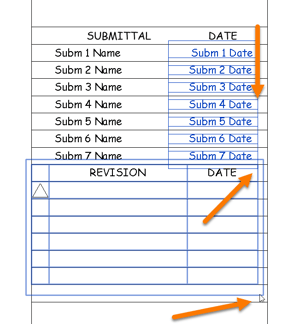
The best way to align these elements is by first selecting all of the Labels that you want to move, then hover over the Revision Schedule with your mouse to highlight it, then use the keyboard arrows to nudge your Labels into place. ←←←
 Repeat the same method with the Submittal Name Labels. →→→
Finally, move the Submittals Headers into alignment with the Revision Schedule Headers. Then sit back and admire your great work.
Our Submittal Schedule and Revision Schedule are now complete.
Go ahead and delete the green Reference Line.
Next up is the Management parameters section.
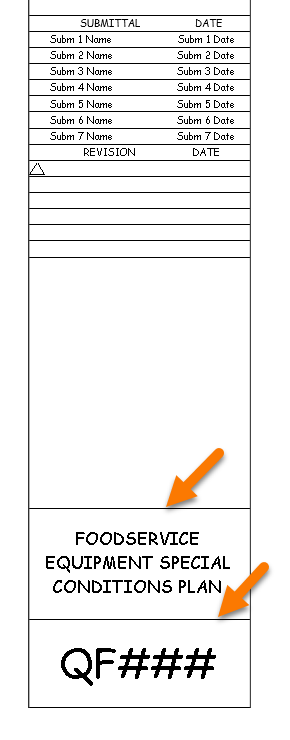 I saved the Management section for last because I knew it was going to be the area that we could all personalize to pull our title block together.
I will give you some pointers and create a Management section of my own but feel free to deviate from my instruction, after all the Management section is just some lines, some Text and some Labels, light work for somebody who just created a Submittal and Revision Schedule.
I am going to begin by adding a couple lines to separate the Sheet Name.
 Next, I am going to copy the line above the Sheet Name up by the height of 2 gridlines.
Select the line above your Sheet Name and click Copy.
Then select the bottom grid line as your base point, then select a point 2 grid lines above.
 Using this same technique I created some more lines with 2 and 3 rows of spacing apart.
I am going to use the 4 rectangular spaces for the Management parameters that I like to use in my title blocks: Drawn By, Checked By, Scale and Project Number.
I will first add (4) Text Notes to act as the Header for each parameter, then I will add (4) Labels linked to the Project Information parameters.
These parameters are standard in every Revit project and easy to find when creating the Labels.
 Drawn By
Checked By
Scale
Project Number
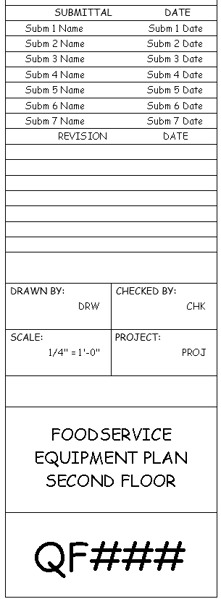
Here is what it looks like when finished.
I also moved the Submittal and Revision Schedules down to bring everything together.
I don’t know about you but I sure am excited to try this thing out, let’s Save then click Load into Project and Close.
Alright so it looks great but a little empty, let’s fill in some of these parameters so we can see what it looks like full. Let’s start with the Project Name and Project Address.
Click on the Title Block family to show the missing parameters.
Then click on the ? to activate the text box where you can type in the value.
The value that you type in becomes the Instance parameter value.
Let’s me show you.
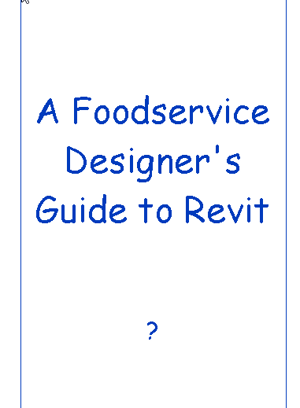
First click on the Project Name parameter and name your project, I will name mine “A Foodservice Designer’s Guide to Revit”.
 Now let’s fill in the Project Address, once again click on it to change the text.
Not sure about you but this doesn’t work for me, there happens to be a bug in Revit 2017 and Revit 2018 that causes Project Address to not work when clicked from a Title Block family on first use.
It’s just a little stuck but I do have the solution to fix it, go up to the Manage ribbon and click on the Project Information button.
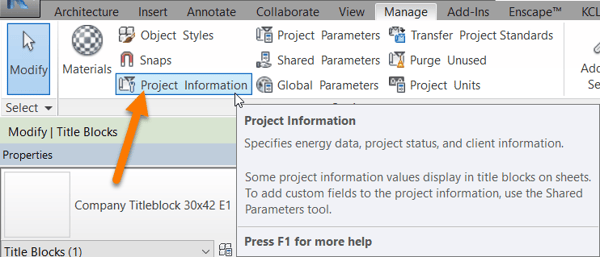

This will open the Project Information parameter window. The parameters shown in this window are the default Project Parameters for all projects in Revit.
To fix the Project Address bug, click on the cell to make the … button appear, then click that button.
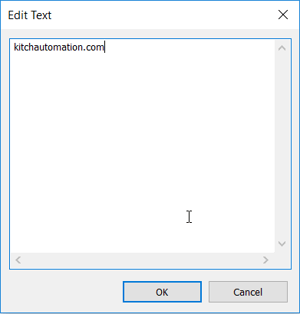
This will open a Text Editor, typing anything will break the spell and fix the Project Address parameter. I will use the address to find this guide, “kitchautomation.com”.
Press OK after you finish typing.
Before we leave the Project Information parameter window, notice that like I mentioned earlier, when you fill in a blank parameter in the title block family, you are actually filling in the same parameter in the Project. That is the magic of the Label.

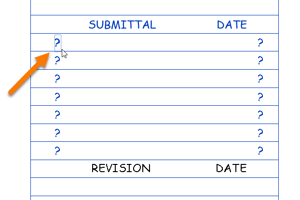
We got the Project Address parameter to work, how about the Submittal parameters?
Once again something seems broken, none of these ? can be clicked and normally they can be.
This is no bug though, this is because we haven’t introduced our Shared Parameters to our Project.
We used 14 Submittal parameters in our Title Block family from a Shared Parameters file but we never told our Project file about those Shared Parameters.
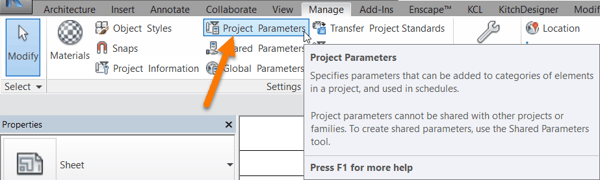
So let’s add these Shared Parameters to the Project now, go to the Manage ribbon and click on the Project Parameters button.
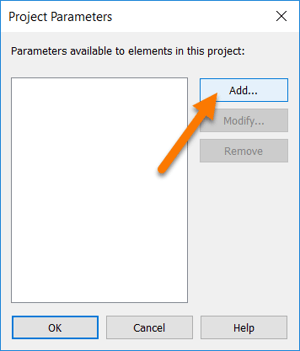
The Project Parameters window will appear but its empty, let’s Add a parameter.
Click Add…
We happened to have stumbled onto the Project Parameter creation tool. This window allows you to create parameters for projects.
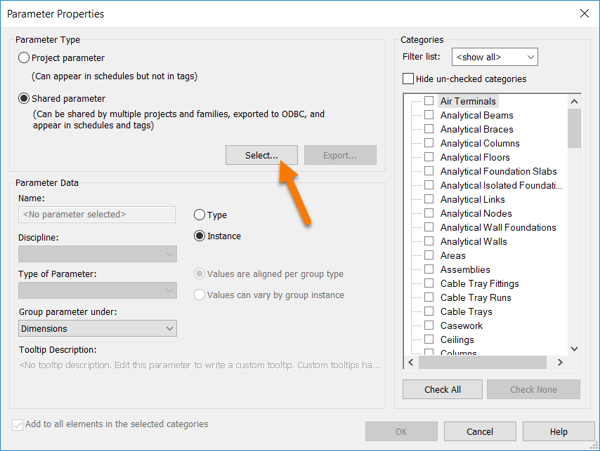
First we have to choice between a Project Parameter and a Shared Parameter.
This is misleading because like we learned earlier, Project Parameters can be Shared Parameters.
We need a Shared Parameter though so select the Shared parameter button and then click Select…
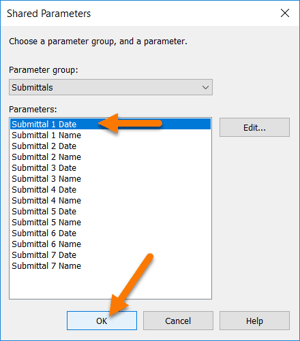
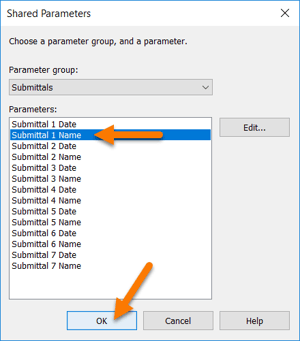
This opens up the Shared Parameter selector, since we only have one group it opens to Submittals by default.
Select the Submittal 1 Name parameter and click OK.
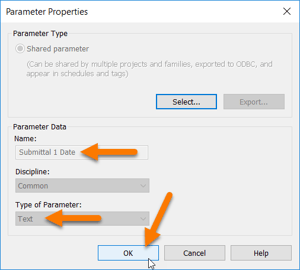
Once we select the shared parameter, we return to the Project Parameter Properties window to configure it.
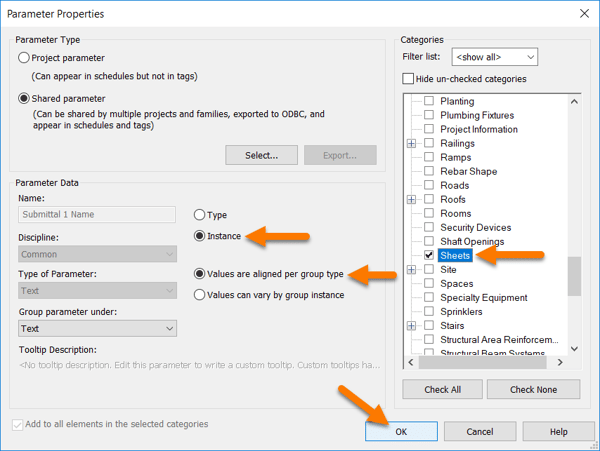
Select Instance parameter since all Sheet category parameters must be Instance parameters.
The Values by Group radio button is not important, we are not using Groups in our title block.
Finally make sure you select the Sheets category and no other categories, as you can now see Project parameters don’t have to be confined to one category.
Once finished click OK.
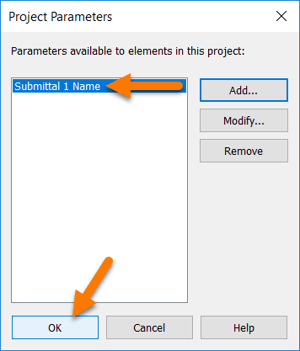
That will return us to the available Project Parameters window, but this time we actually have a parameter to choose.
Select the Submittal 1 Name parameter and click OK.
Give the Submittal 1 Name parameter another glance and now it is active and can be clicked and changed.
 I will name my first submittal “Concept Design”.
Glorious.
Now we just need to Add the other 13 shared parameters to the Project so the rest of the Submittals work.
Let’s do this now.
There is one final piece to test, the Revision Schedule.

Let’s create a Revision by going to the View ribbon, then click the Revisions button.
Hmm, looks like there is already a Revision in here.
That’s correct, Revit creates a default Revision for every project.
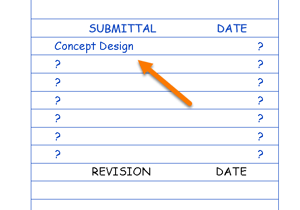
The reason this Revision is not showing up in our Revision Schedule is due to the way that Revisions work. They do not show up in the Title Block Revision Schedule when there are no Revision Clouds on the current sheet. To test this, all we have to do is create a Revision Cloud. Let’s try it.
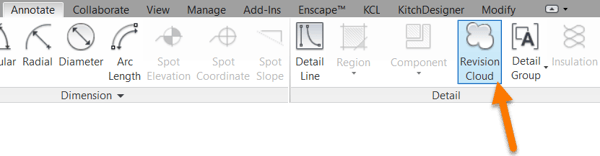
On the Annotate ribbon, click on the Revision Cloud tool.
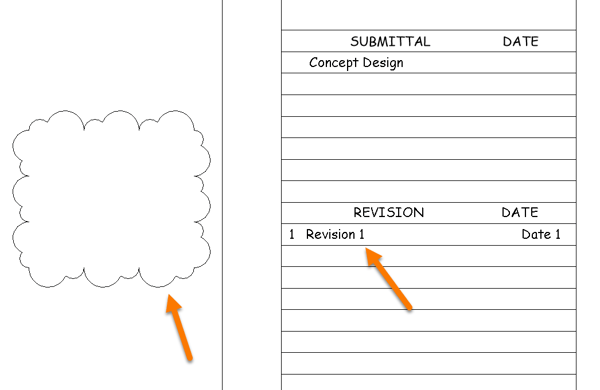
Then just draw a simple rectangular cloud anywhere in the Drawing Area.
 Success!
Alright let’s keep testing the rest of our Title Block, we will go over Revisions thoroughly once we finish the Title Block.
Scroll down a bit to find the rest of the sheet parameters. To change them, just click on them.
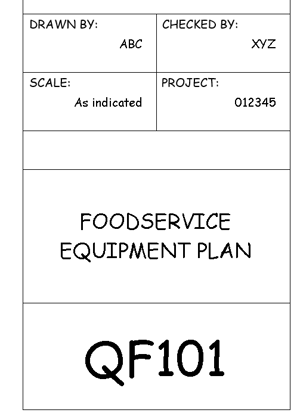
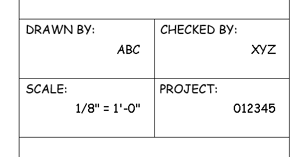
Well except for the Scale, that is determined by Revit. As you can see, it says “As indicated” now and it can’t be changed, that is because we have multiple views on our sheet and those views have different scales.
To test this out, change the Floor Plan View to 1/8” scale, then your Title Block should update with 1/8” = 1-0’ since all of our views at now at that scale.
Congratulations on building your very own Title Block, and a very nice one too, I hope your new Title Block is seen far and wide!
Thank you for attending the Kitchautomation Academy!
Next up- Create a Revision Cloud Tag
Cheers!