
Hello, everybody! My stomach wasn’t feeling very good this afternoon, I ate some cheese risotto with some very spicy chorizo slices. While this may seem to be an odd combo, it tasted very well because the spiciness compliment the sweetness of the cheese very well. In our lives we will encounter many such odd-combnations that work so well and today, we will talk about an odd combination that worked really well – Bronica and Nikon!
Introduction:
Today, we wil be covering a rare topic, the overhauling of the Bronica’s special helicoid! I didn’t find any good references online so I hope that this will help you fix yours. This is a rare topic and this should show you how this thing really works. There are people who’ll claim that there are no provisions for adjusting the focus on this thing but this article is going to show you how to do it and dispel this myth. Let’s go on a Bronica ride!
 My Bronica S2a looks really compact because the Nikkor-P 75mm f/2.8 lens is small. If you think that the lens comes with its own focusing unit then you are wrong. Earlier Bronica-fit lenses don’t have any focusing units so you will need a separate helicoid to do that for you. The grease on the helicoid will sometimes get gummed-up and this is going to be our subject for this article. I don’t see any good references for this so I decide to make one.
The Bronica S2/S2a system uses a removable helicoid for focusing because earlier models have the helicoids built-in to the body (eg: Bronica Deluxe) so the lenses don’t come with any focusing units. Later Bronica-fit lenses have helicoids on the lenses and the helicoids aren’t needed. With this system, the Bronica S2/S2a will accept both paradigms. I would like to think that this is a transitionary model for Bronica, very much like what the Nikon F4 is for the Nikon F-mount system of cameras wherein it can use lenses from different generations of F-mount Nikkors with full or partial support.
 Here are the separate parts for the Bronica S2a’s front-end:
- A: The main camera unit which comprise of the body, film back and finder.
- B: The focusing helicoid. You will need this for lenses with no focusing unit.
- C: The lens. This is basically just an objective with an iris mechanism.
This three-part system makes the Bronica S2/S2a very customizable because it can accept a wide range of accessories and lenses. There’s even a bellows unit made specially for the Bronica which allows you to take very technical photos very much like what a Horseman large format camera system is capable of. I really love the Bronica system and I believe it is one of the best out there. Calling it the “poorman’s Hasselblad” is just wrong.
The Bronica S2/S2a system is very compact due to the mirror which flips down and slides forward to avoid the lens as opposed to the usual movement of mirrors on SLR cameras which flips up. This has problems of its own because it’s much more complicated and the light from the top can affect your exposure because there is nothing covering the top, the mirror on conventional SLRs movements flips up and acts like a cover of some sort. We’ll talk more about the Bronica system in another article and for now, let’s begin with tear-down because this is what you are here for anyway!
Before We Begin:
If this is the first attempt at opening a lens then I suggest that you read my previous posts regarding screws & drivers, grease and other things. Also read regarding the tools that you will need in order to fix your Nikkors.
I highly suggest that you read these primers before you begin (for beginners):
- Essential tools
- Best practices 1
- Best practices 2
- Best practices 3
- Ai conversion
- Working with Helicoids
Reading these primers should lessen the chance of ruining your lens if you are a beginner. Also before opening up any lens, always look for other people who have done so in Youtube and the internet. Information is scarce, vague and scattered (that is why I started this) but you can still find some information if you search carefully.
I highly recommend that you also read my working with helicoids post because this is very important and getting it wrong can ruin your day. If I can force you to read this, I would. It is that important!
For more advanced topics, you can read my fungus removal post as a start. This post has a lot of useful information here and there and it will be beneficial for you to read this.
Disassembly:
The Bronica’s helicoid were designed to be as compact as possible as to not impede with the operation of the camera and keep things compact. This makes the helicoid a little bit more complicated in terms of construction as engineers try to fit as much things into the smallish housing. There are some things that are unconventional with this thing and I’ll guide you through each of the steps so you won’t get confused. As far as I know, this’s the only article on the internet that talks about the disassembly of this thing in such detail.
 Before you begin removing anything, inspect the helicoid and take notes or pictures just to remind you how things were originally so you will have a reference point to go back to later. Check for tolerances between the parts and other noteworthy features. Remember to always work while this thing’s focused all the way to infinity. This way, you will always have a reference point. Keep this in mind and you will make less mistakes along the way.
 The light baffles of this thing also function as the rail for the helicoid keys. Carefully see the picture above and you will see the helicoid keys on the 3:00 and 9:00 positions. These baffles can be carefully removed after you got rid of the screws that secure them. Before you remove these, take some pictures and note which screws should go where. Some of the screws aren’t identical and putting them back together the wrong way could result in damaging these parts. The baffles can be stiff but with care and patience you can remove them easily enough. Make sure not to warp these or the focusing will be compromised.
 Next, carefully remove these parts. This is the stop-down lever and it should be put back together in the proper sequence. This part is easily bent so be careful. Again, take plenty of notes or pictures before you remove this. Clean it with naphtha and don’t lubricate it with anything. Lubricants will get gummed-up eventually and you don’t want that here!
 Here’s the last of the baffles. Carefully clean the baffles or you can just soak them in a vat filled with alcohol. This alcohol bath will remove any smell or gunk and just use a clean toothbrush to scrub it clean. Air-dry these and keep them in a safe place.
 In order to remove the focusing ring, you will need to remove the numerous screws that secure it to the helicoid. Remove the screws that hold-down the focusing scale. The scale is made of a thin strip of metal and be careful not to fold or damage it! Clean it carefully with a tissue saturated with naphtha because these things usually hold plenty of dirt and oil underneath them. Again, store this in a safe place while you work on the helicoid.
These were also sold as separate parts with different marking corresponding to different focal lengths. You will notice that if you use a 200mm lens, the distances on the scale will not match and you will be left scratching your head. The solution to this is to replace this strip with one that has the correct distances for a 200mm lens. Same goes for lenses with other focal lengths such as the wider 40mm and 50mm lenses. Availability may be scarce because the supply has since been depleted. Your only chance of acquiring one is to buy a helicoid with the desired markings. Good luck finding one because they are very rare!
 The focusing sure has plenty of screws! Carefully unscrew these 6 screws and be careful not to strip the head. I found that these screws were made with cheaper stuff and they’ll corrode over time. If you have parts you can replace the rusted once with new ones from your spares. Never mind the fact that the baffles are still intact here.
 Once all those screws are gone, the focusing ring can now be removed. It can be stiff and you may need to place some acetone or solvent to soften the glue used on this. Note how things line-up while this is turned to infinity because this will be your reference point.
 Here is a view of one of the helicoid keys. Since the baffles are now gone, the helicoid can now be freely turned. Without the notes that I told you to make earlier, you can easily be frustrated when things don’t line-up properly when your reassemble this later.
 The inner helicoid can now be turned until it’s free. Always make a mark or take a pic to remind you where the helicoids separate. Forgetting to do so will result in hours of angry frustration as you guess where things should mate. Read my article on how to work with helicoids so you will have more knowledge on this matter because many people get stuck in this and end up with a useless pile of parts. I never accept these kinds of jobs so do not bother sending something like this to a repairman! Prepare to pay a premium if you did.
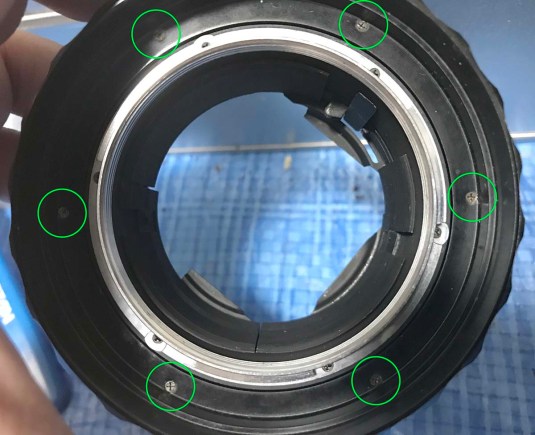
 Please pay attention to the picture above. I have labeled the screws here as A and B. Each one of them have 3 pieces and they both perform 2 different things.
- A: These screws secure a small tab that prevents a shroud from getting loose. These tabs can easily get lost so be careful. These screws also secure the bayonet mount to the helicoid underneath it. Notice that it’s made of a different material.
- B: These screws just secure the bayonet mount to the helicoid underneath it.
You can remove these screws now or later as you go. It really doesn’t matter but always take some notes and pictures so you’ll know how the bayonet mount should be oriented.
 The shroud can now be removed. This shroud moves up and down to block away light or dust as you turn the focusing ring and out. The shroud is only made up of thin plastic.
 The bayonet mount can easily be removed now that the 6 screws are all gone. To make it easy for me to know its orientation, I made a very small mark on the helicoid away from the threads to remind me where the red mark on the bayonet mount should be.
 Remove this screw to free the helicoid key underneath it. There’s also another one on the other side by the way. Sorry for the blurry picture, it was back-focused.
 And here is the helicoid key. Make a small mark underneath one of the helicoid key and where it was situated. This way you will not get mixed up and put the key on the wrong side. These were broken-in to their respective rails and it’s best that you put them back in the same position. When putting these back together, never over-tighten these and leave a little bit of play. This will ensure that these won’t get snagged and damage the rails. The helicoid keys will also wiggle in their rails a bit as you focus in or out and this will make it feel a lot smoother as it glides and adjust itself to the rails. The screws also have to be sunk-in enough so that it will not be in contact with the threads on the opposing helicoid.
 To remove the central helicoid, you will have to remove this brass ring first; before you remove it, make 2 fine lines so you will know how they were originally oriented. Now, I know that this is sloppy but I would rather have these marks then regret not having any later on during reassembly. These will serve as guides and will save me a lot of time and frustration later. I rather err on the safe side of things then get angry and blame people.
This is where you adjust the helicoid’s focusing if you need to. You simply loosen the set screws until this brass ring is moving freely. Focus on a far-away object and make sure it is in focus. This will be your infinity point and that object far-away (7km or more) should be perfectly in-focus on the film plane. You will need a special tool for this and I’ll show you how to make one in a future article. You can also confirm your focus with the screen but this won’t be as accurate as the measurements done from the film plane. Only adjust this if you know for sure the the helicoid is messed-up by a previous repairman of if this brass ring have moved somewhat due to stress or being forcefully turned. In most cases, just leave this alone because this is a very delicate job! Also remember that you will need a different focusing scale for different focal lengths. My sample only shows the scale for a 75mm lens. Some have a combination of 2-3 focal lengths. If your 135mm lens does not seem to correspond to the focusing scale of 75mm lens then that is the problem and not the helicoid! Now, if both your helicoid’s focusing scale is for a 75mm lens and if you are getting incorrect distance readings with a 75mm lens from the focusing screen or when you develop your film then the helicoid is probably the problem so long as you are sure that the focusing screen is calibrated properly. I know that it can be confusing but this is only determined by a series of deductive reasoning. Only Bronica owners will get this.
 To remove the brass ring, simply remove these grub screws. There are a couple of these around the ring. Be careful and make sure that you mark which holes they should be in. The other holes are there for the screws on the focusing ring. If you don’t want to do that then just loosen the grub screws and just leave them there so you don’t have to mark the holes with a sharpie or anything. These grub screws are delicate so be careful.
 After the screws are gone, you can now separate the central and outer helicoids. The ring is also preventing the helicoid from rotating past its focusing range very much like what a helicoid stop does on a typical Nikkor lens. It is sandwiched between the 2 helicoids so you will have to put it back together this way, too. Look at that old grease, yuck!
That’s it for the disassembly! I would like to remind you again that you should not go on and calibrate the focus of your helicoid until you are sure that the helicoid is not working properly. The Bronica S2/S2a is notorious for focusing errors and this problem has more to do with the focusing screen than the helicoid. I will show you how to fix that in a later article. For now, just leave it alone and put it back together according to your notes.
Conclusion:
That’s it for the helicoid. This project will probably take you a whole evening with most of that time going to the cleaning of the helicoids and other parts. Carefully clean all of the helicoids with a petrol-based solvent and alcohol to wash off whatever residue was left by the petrol-based solvent. Make sure that you clean them very well because if you left anything there it will make your helicoids feel gritty. A stiff-brissled brush or a piece of Scotch-Brite should do the trick. Once you are satisfied with your work, you should use a light grease on this thing because a thicker one will make this hard to turn. Notice that it has fine threads on one set of helicoids and having a thicker grease used on those will make this harder to turn which will strain both the photographer and the gear.
A little bit of grease should also be applied to the rails and the helicoid keys where they come in contact to make them operate smoothly as the helicoid keys glide within the rail. You do not need a lot of grease on this part and a very thin film is more than enough. Too much grease here will just make things sloppy and the grease will migrate elsewhere and cause a mess. Use the same grease for the helicoids and you will not worry about when it mixes with the grease on the helicoids when the grease migrates due to age because both parts are lubed with the same thing so grease contamination is not a problem.
The most important thing that I have to warn you is the tolerances of the helicoids. If you took notes and measurements then you’re all good. If you want to be super-sure then you can even count how many turns it took before the helicoid disengages. If you got this all wrong then your helicoid will not focus properly since everything’s off! The helicoid with the finer threads is the one that you should worry about because it’s harder to guess with as opposed to the ones with the bigger threads. Just like I said, notes and pictures will be very useful to help you get things back together.
By the way, Wil (one of our readers) has this to say:
- One of my helicoids (presumably the older one) has three tabs that keep the shroud from getting lost, like the helicoid you are working on. My other helicoid has six of them.
- You mention the shroud to be made of plastic. Mine (from the older helicoid) is made out of brass. I know this because the paint chipped here and there.
- The brass ring that has to be removed to access the inner helicoid is fixed on a black (aluminium) part in your sample while it is fixed on a brass part in the case of my helicoid.
Thanks for the input, Wil. I am sure that this will be helpful for other readers.
That’s it for this article, I hope that you enjoyed this and I sincerely hope that this article will be a welcome resource because there’s not a lot of things online for this. Now, you may be wondering why I am covering a Bronica because this blog is mainly for Nikons. I am only doing this because earlier Bronica cameras uses Nikon lenses. Bronica does not have the capacity to manufacture their own lenses so they needed the help of a separate entity that does and the owner of Bronica only wanted the best so Nikkors were used. I’m very pleased to discover the Bronica system for myself through “Bronikkors” and I hope I can influence you to get into Bronicas as well or at least raise awareness on this system. I don’t like it when the Bronica system is poo-pooed because Hasselblad is considered to be “the best”. Well, let me tell you that the only reason why many people do that is because Hasselblad uses Zeiss optics. Without it, things are more or less equal and many will even dare say that the Bronica system is more reliable. Don’t let the name influence you!
Thank you very much for reading this article and if you enjoyed this, please share it with your friends on social media. If you have anything else to add, please message me and I will see what I can do. I am all for disseminating information so I am “all ears”. I am also willing to learn from people who came before me. If you want to take somebody by the hand, I’m willing to learn from you. Thank you again and visit my blog regularly, Ric.
Help Support this Blog:
Maintaining this blog requires money to operate. If you think that this site has helped you or you want to show your support by helping with the upkeep of this site, you can simple make a small donation to my paypal.com account (richardHaw888@gmail.com). Money is not my prime motivation for this blog and I believe that I have enough to run this but you can help me make this site (and the companion facebook page) grow.
Helping support this site will ensure that this will be kept going as long as I have the time and energy for this. I would appreciate it if you just leave out your name or details like your country and other information so that the donations will totally be anonymous it is at all possible. This is a labor of love and I intend to keep it that way for as long as I can. Ric.

Jul 30, 2018 @ 19:01:50
Hi Ric
First of all: Too bad you’re a Nikon shooter – it’d be great if there were more repairs of different brands lenses on your blog ;-). Luckily I found this entry on the Bronica (yeah) helicoid and decided to give it a go myself. I recently purchased a Nikkor 75/2.8 with a focusing helicoid for a reasonable price, so I’m not to lose much money if anything goes wrong…
Now my remarks are the following:
1. One of my helicoids (presumably the older one) has 3 tabs that keep the shroud from getting lost, like the helicoid you are working on. My other helicoid has six of them.
2. You mention the shroud to be made of plastic. Mine (from the older helicoid) is made out of brass. I know this because the paint chipped here and there.
3. The brass ring that has to be removed to access the inner helicoid is fixed on a black (aluminium) part in your sample while it is fixed on a brass part in the case of my helicoid.
I write this in the hope that it could be useful for other people.
Unfortunately I couldn’t remove that brass ring because one of the screws had obviously a treatment by someone else who “serviced” the helicoid. Since I don’t absolutly have to tear it apart I decided to let it be – the whole thing is already waaay cleaner than it was when I bought it.
Last but not least: Thank you very much for your insightful blog entries – a great source of information not only for Nikon shooters 😉
Cheers – Wilu
Aug 13, 2018 @ 02:01:59
Thanks, Wil!
Sorry for the late reply and I appreciate your input. I will add that to the blog when I have the time.
I try to add non-Nikon stuff but they don’t seem so popular 😦
Ric.
Mar 04, 2020 @ 06:44:54
Hi Richard, apologies in advance to go a little off topic on this entry.
I’ve scoured the net for days but yet to find a solution to my fungus infected Nikkor-P 75mm disassembly conundrum. Rear elements are straight forward. They are now nice and clean.
Front element access has me perplexed. I would have thought the front inner cone would simply unscrew but it won’t budge and I cannot see a lock screw anywhere on the barrel. I’ve applied lots of acetone to the thread between cone and filter ring to no avail. I don’t think there is any need to disassemble the aperture mechanism housing at the rear.
I could be wrong but I can’t see how removing the aperture ring assembly on the front of the barrel would provide advantage ‘unless’ there is lock screw under it.
Any suggestions?
Finally your blog has saved me hours of work in the past. Huge resource – respect 🙂
Jun 21, 2020 @ 15:21:42
Richard, interresting read… By any chance, do you have info about opening Bronica S2A lenses for removing fungus and dust? I’m trying to find information for this lens: Nikkor-O 1:2.8 f=50mm 30252 Nikkon. Thanks in advance. Raymond van der Aa
Jun 11, 2021 @ 19:48:18
Thanks for an insightful and useful article on the Bronica Nikkor helicoid. I did a search on your blog for Bronica Nikkor lenses, but found nothing, so can I ask that you do a tear down on (some) of these wonderful lenses? I’ve two (75mm and 40mm) that need cleaning/repairs desperately. Thanks. Ting
Sep 02, 2021 @ 06:50:42
Are there ANY lenses for Bronica S cameras that do NOT need a focusing helicoid?
I was gifted a Bronica S body, 1959ish, no helicoid on I
Thanks
Sep 02, 2021 @ 13:23:01
T Lee Keene,
There are the “normal” lenses that attach to the focusing helicoid (most lenses from 40mm to 200mm). Those should also mount to your S – they just don’t need the helicoid because the S has a rack and pinon sort of focusing mechanism built into the body (so it’s perfectly normal that your camera didn’t come with a focusing helicoid).
Then there are lenses like the Nikkor 105mm f3.5 with built-in shutter and the long lenses (300mm plus). They all have a built in focusing helicoid, thus don’t need a seperate one. But they won’t fit your S because they mount to the big bayonet of the C, S2, S2A, and the EC-familiy.
Then there is at least one longer lens that will only fit the S (and D), but not the large baynet of the other focal plane Bronicas. Unfortunately I don’t know which one it is, maybe a 180mm or 250mm.
Cheers
Sep 05, 2021 @ 02:17:58
Hi, know this is an old post, but is there any advice you might be able to give me for realigning the two threaded parts? the way i see it there’s only a set amount of ways it can go in, but i’ve been trying for days now and i just can’t get infinity right, my issue is that i was too stupid to mark anything or count threads before i removed the “retaining piece” with the 3 screws. Any help would be appreciated.
Nov 08, 2022 @ 23:17:59
where can I find your entry about cleaning and calibrating the focus screen of a Bronica S/S2a?
Dec 13, 2022 @ 08:38:44
i’ve just read each lens has three ways to connect to helicoid or is it there are three lenses!
Dec 15, 2022 @ 21:38:49
The camera has a large bayonet. There are some lenses (mainly the long ones) that are connected to the camera via this bayonet. But most lenses are attached to a focusing helicoid, since they don‘t have their own focusing mechanism. This focusing helicoid is attached to the camera via the large bayonet and sports a small bayonet on the front end ehere the lenses are attached to. Plus there is a 57×1 mm thread on the inside of the small bayonet. You can use this to adapt other lenses to fit the camera, as long as their flange distance is long enough.