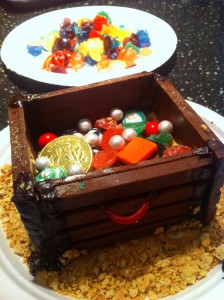
Candy Treasure Chests with New Zealand Treasure
Candy treasure chests are easy and fun to make. Imagine a child’s delight at having an edible box of candy! Make these candy treasure chests today!
Ingredients
- 1 1/2 - 2 Cups graham cracker crumbs
- 6 (1.5 ounces each) Kit-Kat Wafers
- 3 Ounces chocolate (melted)
- 2 Tablespoons unsweetened cocoa powder
- 1 red licorice lace
- Gold foil-wrapped chocolate coins
- fondant pearls
- hard candy jewels (these can be purchased on Etsy)
- an assortment of candies (your choice)
- small pastry brush or popsicle stick (for painting on the melted chocolate)
- pastry brush (for dusting on the cocoa powder)
Directions
|
Step 1
|
| Place 1 cup of graham cracker crumbs on a plate. This will act as the “sand” on which the treasure box sits. |
|
Step 2
|
| Unwrap the candy bars and set aside. Melt the 3 ounces of chocolate at 30 second intervals in the microwave until it can be stirred smooth. You can also warm the chocolate over low heat in a small saucepan. |
|
Step 3
|
| Press a candy bar turned horizontal and standing upright into the graham cracker crumbs. Paint chocolate on the short ends of another chocolate bar using the popsicle or small pastry brush. Place the short end of the wafer bar brushed with chocolate against the short end of the standing chocolate bar. Press down into the graham cracker crumbs. Apply a third candy bar onto the other end of the wafer bar brushed with chocolate, forming three quarters of the box. Repeat with a fourth chocolate wafer bar and fit it between the two open short ends to close the box. Hold until firmly adhered, a few minutes. |
|
Step 4
|
| To make the lid, use one whole candy bar (4 pieces) and 1/2 of another bar, broken at a perforation. Brush the broken end of the 1/2 bar with melted chocolate. Press the two bars together so they line up evenly on all sides. Place the unsweetened cocoa in a small cup. Load a dry pastry brush with the cocoa powder and brush over the surface of the box top. Transfer the box top to the refrigerator and chill until firm. |
|
Step 5
|
| For the box handles, cut the licorice lace into two 2-4-inch pieces. Bend the licorice pieces slightly to create a curve. Dip each end of the licorice into the melted chocolate. Press the ends of a licorice piece into a break-apart perforation and hold until the chocolate adheres. Repeat process on the other side of the box with the remaining licorice piece. |
|
Step 6
|
| Use some or all of the remaining graham cracker crumbs to fill the box, depending on the amount of candy you are using. Fill box with candy assortment, fondant pearls, and hard candy jewels. Brush seams with cocoa powder, to mask the melted chocolate and give the box an aged look. |
|
Step 7
|
| Paint the edge of the lid with melted chocolate (reheating the chocolate may be necessary if your chocolate starts to set). Only paint the parts that will be in contact with the box--this depends on the position of the lid. Press unto the box top. |


 Print recipe